Wednesday, May 30, 2012

CARD INSPIRED WHILE SHOPPING

About two weeks ago I was shopping for some flowers to plant in a new flower bed my husband built for me.  While I looked around I saw a table full of beautiful little Moss Roses and the colors were Bright Pink, Light Pink, Yellow and Orange.  They were just so pretty the way the colors were mixed on the table.  

I had this stamp at home and just knew what I was going to do with it.  (The stamp is from Gina K).  

Well, I didn't buy the Moss Roses because the lady helping me actually guided me to some Rose Bushes because I was actually wanting to plant something in that bed that would continue to come up each year.  I bought two bushes and was so pleased with what I found.  The best plans don't always work out.  The holes had to be dug quite deep and wide and we ran into a drain pipe that runs along side of the foundation of our house that was in the way of getting the bushes planted.

Fortunately the garden center let me return the bushes since they were still in their original pots and I picked out some annuals to put in the bed instead.........at least for this year.   And guess what part of the flowers I bought................YES, I bought some of those pretty Moss Roses but only in the Bright Pink and Yellow to go along with some other taller flowers in the same bed.  So the flowers that inspired my card also ended up in my flower bed.

Thanks for stopping by!  What inspires you when you make cards?

Tuesday, May 29, 2012

FOR A FRIEND


One of my friends is having surgery so I made this card for her.  The card base and inks used are SU Not Quiet Navy.  The stamps are from the SU Thoughts and Prayers stamp set.  Going to the workshops recently has made me realize that it is fun to decorate the envelope front or back as well......I just need to remember to do it more often.

Thanks for stopping by!

Sunday, May 27, 2012

PENNY BLACK STICKER #4

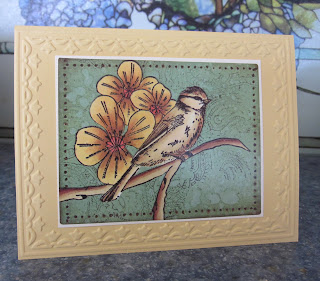
And this is the final card which I made from the sticker sheet.  I embossed the light yellow card stock with an embossing folder.  All of the stickers were put onto card stock before attaching them to the card. 

I hope you enjoyed seeing that it is possible to make quick and easy but also very pretty cards using stickers.

Thank you for stopping by!

Saturday, May 26, 2012

PENNY BLACK STICKER #3

The card base is actually a light yellow which goes very well with the sticker but unfortunately the picture seems to make it look much lighter.  The dp is from a paper pad.  I don't think it needs a lot of explanation so if you have any questions, just send me an email.

Thank you for stopping by!

Friday, May 25, 2012

PENNY BLACK STICKER #2

To begin I embossed the card stock with the SU Tulip folder which adds such a pretty border to cards.  Once again I added the sticker to a piece of off white card stock and trimmed it leaving a very narrow border around the main design.  I love this sticker and Penny Black has the very same design in a stamp which I also have. 

Thank you for stopping by!

Thursday, May 24, 2012

NEW PENNY BLACK STICKERS

Recently I received an order for customers from Penny Black.  I had ordered some of the new Penny Black stickers and I made four quick cards using a sheet.  I love the colors.  I am disappointed in the way the colors show up on the picture  because the card stock really does match the sticker very well.

First I took the sticker off the sheet and stuck it to a piece of off white card stock and then trimmed it down to have a narrow margin of the card stock showing.  I used a scrap of designer paper from a paper pad I had to put  behind the sticker layer.  There are three butterflies on the sheet so I added the one down in the corner to finish the card.

Over the next three days I will be showing the other cards made with the stickers from this sheet.  I do have more sheets of these stickers in case anyone is interested in them.  Just email me at this address:  vboddicker@aol.com

Thank you for stopping by!

Wednesday, May 23, 2012

PINK AND BROWN SWAP

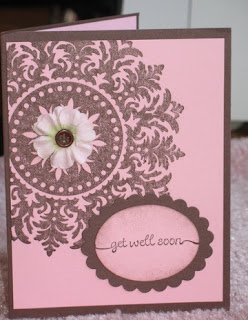
I needed a Pink and Brown card for a swap on our Yahoo Group.  I hadn't used the SU Medallion stamp in a long time so I decided to use that as my focal point.  To begin, I cut a piece of pink card stock to approximately 3 3/4 x 5 inches.  I stamped it with brown on the pink card stock and added two Prima flowers that have a light pink coloring to them and finished the flower by adding a brown button in the center.

The sentiment was stamped on pink card stock and then cut with a Spellbinders oval.  As you can see I sponged the edge of the oval once it was cut with brown ink and then adhered it to a brown oval which had been cut with a Spellbinders scalloped oval.  The entire layer was then added to the brown card base.

Please let me know if you have any questions about the card.  Thank you for stopping by!

Tuesday, May 22, 2012

RED AND WHITE

One color combination that makes a really bold statement is Red and White.  There are five layers plus two layers for the little sentiment.  I stamped the flower design with VersaMark ink and then heat embossed it using white embossing powder.  I really like the way this card looks.

Thank you for coming  by!

Monday, May 21, 2012

HUMMINGBIRD

This Hummingbird card was made using the Stampin' Up! "Elements of Style" stamp set.  The Humingbird was stamped using one of the Navy inks, cut out and added with a pop dot.  The little label was made with a punch and has the Navy ink edging which was applied with a sponge.  It is just laying on the card for right now because I like to leave those blank until I know whether it will be for a birthday, get well or other occasion.  

The colors used were Chocolate Chip, Night of Navy and I believe the green is Wild Wasabi.

Thank you for stopping by!  Be sure to let me know if you have any questions.

Sunday, May 20, 2012

GET WELL WISHES

Yesterday I once again attended a workshop day where I made cards from about 10 in the morning until 5:00 that afternoon.  This is such fun for me because I don't have to think about what to make.  Materials are furnished and a sample card is at each work station.  When I don't have to think, it is so much easier to get many more cards made in a single day.

This card was made using SU card stock, stamps and markers.  I think I heard right that the flowers are from a Hostess Set.  The flowers were stamped twice.   I added gems to the center of most of the flowers after I got home.

I can't believe it but my computer had been returned to me and was working last night.............today NOTHING will come up.  I am using my husband's laptop and things are a bit different here.  I do have enough cards to post over the next week or two so hope I an steal away time from my husband using his laptop.  :)

Thank you for stopping by!  If  you have any questions about the cards I'll be posting, please let me know.  I'm always happy to offer help where I can.

Thursday, May 17, 2012

BLOG POSTS

I am having some minor computer problems and am just getting things up and running again.....hopefully.  When I just checked my blog posts, I discovered a whole list of "drafts" that for some reason didn't get posted.  The first two I checked were ones from last Saturday and Sunday, which included a "Mother's Day" post.

I checked all of them that showed up as "draft" and then clicked on "publish" so I don't know if you will get a lot of emails with those posts or not.  I'm not thrilled with the new blogger format.

Let me know if you have any questions.

Monday, May 14, 2012

MORE TULIPS


For today's card I embossed the white card base with the Stampin' Up! Tulip embossing folder.  I then stamped the vase of tulips and the sentiment onto the card base for a one-layer card.  Once again I used Stampin' Up! markers to color the image.  The SU markers do not bleed through the card stock.  For this one I stamped the single tulip on the lower edge of the inside of the card and colored it but also stamped and colored it in the lower corner of the envelope.  I need to remember to do this more often. I think it does make the presentation just a little more special.

Thank you for stopping by!  So what do you think?

Sunday, May 13, 2012

HAPPY MOTHER'S DAY!!!

I had purchased a little stamp set from Taylored Expressions which I had not gotten around to using yet.  I love Tulips since they are a sign that Spring is here.  

The card base is Stampin' Up! So Saffron card stock and I ran it through my Cuttlebug using a Cuttlebug embossing folder.  I cut and embossed a white layer using the Spellbinders Beaded Ovals. To get the stamped image placed in the center, I used my Stamp-A-Ma-Jig and then colored the image with SU So Saffron, Blissful Blue and Mellow Moss markers.

I don't usually take the time to decorate the envelopes, but there is a single tulip image in the same set and I decided to add it to the flap of the envelope and color it.

Thank you for stopping by!  I do love reading your comments so tell me what you think.

Saturday, May 12, 2012

PENNY BLACK FLOWER


Today's card was made mounting a Spellbinders's die for the background on a pink card stock.  When I cut out the Labels 17, I left the piece in the die and sponged a light yellow ink around the flower design which had already been stamped.  The flower deign is from Penny Black.  Copic markers were used to color the image. 

This was a pretty simple card to make.  If you have any questions, be sure to ask.  Thank you for stopping by!


Friday, May 11, 2012

STAMPIN' UP "FRESH VINTAGE" SET

When I attended the SU workshop in March, I used this stamped design in pink.  Since I have this stamp set, I decided to use it again only vertically.  I already had a blue layer cut out from SU Blissful Blue card stock.  That layer was then embossed with the little embosser from SU and I used a white gel pen to highlight the raised dots around the oval.  

The SU large oval punch works perfectly to get a white layer for inside the embossed oval on the blue layer.  Before punching it however, I did stamp the image which had been colored with a Blissful Blue marker.

I heat embossed the "Happy Anniversary" using Judi Kins Opaque White Embossing Powder on a tag which was made with a Spellbinders Tag (Fancy Tags).  The sentiment was lined up on the tag using my Stamp-A-Ma-Jig and the tag was attached after running it through my Xyron.

It felt so good to make some cards today.  I will be sharing them over the next few days.  Thank you for stopping by!

Wednesday, May 9, 2012

RESPONSE TO A COMMENT

Before this new "format" I always got an email with the comments from individuals and then I got to choose if I posted them.  Only a very few were not posted.  Recently I have had a lot fewer cards to post but noticed that no comments were being made.  Well actually there were comments but since I am getting used to the new style of "Blogger.com"  I just discovered that there were comments waiting in a folder for me to publish or refuse.  And there were comments in a "Spam" folder that I didn't know about.  I have now gone through all of them. 

I did want to say something about one of the comments which accidentally went to the SPAM folder.  One person left a nice comment on one of my baby cards but said that more explanation would be helpful since they were a "newbie".  :)  I can appreciate that and I normally do give more of an explanation.  However at that time and yet to this date other family obligations have just not permitted as much time for me to work on my blog.

Please know that if anyone ever has any questions about any of the cards I made.....what I used or how I did something..........be sure to ask me by emailing me at the address which you can find on he right side of my blog.  I always want to be able to answer any questions visitors have.

Thanks for stopping by! 

Tuesday, May 8, 2012

SYMPATHY TO A FRIEND

Recently the father of one of my friend passed away and I made this card for her and her family.    First I stamped a Hero Arts background stamp using HA Soft Wheat ink.  The design is from one of my SU stamp sets that had not been used before.  I colored the image with SU markers and then added some silver to the flowers using a Silver Gelly Roll pen.

The image layer was trimmed down and then mounted onto SU Garden Green and Rose Regal card stock.   Those layers were mounted onto the front of a card which had been embossed with the SU Tulip border embossing folder.

Thanks for stopping by!

Monday, May 7, 2012

ANOTHER BUTTERFLY CARD


Today's card is just a one layer card.  I used SU markers to color the butterflies which were stamped four times on the front of the card.  I stamped and colored an additional one and then added glitter to it before popping it onto the middle one.  I know I'll make more cards similar to this.

Thanks for coming by!


Sunday, May 6, 2012

CASING MY FRIEND, HARRIET

My friend Harriet (allycat cards) made a card recently using this butterfly stamp.  I absolutely LOVED her card because I LOVE butterflies.  Since I also have that same stamp but hadn't used it quite yet, it seemed like the logical time to get it out and make a card.  I liked her card so much I even used the same colors.  I believe she water colored her designs but I shaded mine with Copic markers. 

Harriet's card was a one layer vertical card.  Mine is a horizontal card.  Because I used Copic markers that do bleed through the white layer, I matted mine. The layer was added to an SU Ballet Blue card stock which went well with the blue used on the one butterfly.

This made such a quick and easy card that I decided to make another one using the same stamp.  I'll have another version of this card to post tomorrow.  Make sure you visit Harriet's blog, too!

Thank you for stopping by!

Thursday, May 3, 2012

CLEARANCE ITEMS

I'm sorry there is no new card for today but I just wanted to let you know that there are some new items posted in my clearance items.  There are two Picasa links above.  The Lasting Impressions page has stayed pretty much the same, but there are new stamps added to the first link.

If you see something you like, you can email me at vboddicker@aol.com. 

Wednesday, May 2, 2012

TWO SUNFLOWERS

Last night my husband was gone for the evening so I allowed myself to step away from everything else and make this card.  I had stamped off a few of these images before I took the stamp to the stamp sale this last weekend and it was already colored with Copic markers so all I had to do was decide what I wanted to do with it.

The picture doesn't show the off white background which was mounted onto the SU Close to Cocoa card stock but I ran that layer through my Cuttlebug using an SU embossing folder to give it a nice texture.  The wide green strip and the narrow one were scraps I had on the table.

Thank you for stopping by!  Hopefully it won't be too long and I'll have another card to post.

One of the cards made on  this  vi.deo used this stamp from the Flowing Flowers set.  This isn't a two-step design and I wasn't sure...