Friday, December 31, 2021

PEACEFUL PLACE Spanner Card


Yesterday I was browsing through some videos on YouTube looking for another different way to use this beautiful paper.  I found a video for this card. 

Watching the video is a much easier way to explain how this one is made.  You can see it HERE.

Tonight is New Year's Eve!  The year is ending here with very possibly freezing drizzle making travel difficult if you were wanting to go out.  We weren't planning anything but a quiet evening at home.  The New Year 2022 will be starting off with a windy 4-7 inches of snow here.  Hope that isn't any prediction of what 2022 is going to be like because like everyone else, we are ready to feel we can have a more normal life.  

Wishing all of you a very HEALTHY, HAPPY NEW YEAR!!!!  


Thursday, December 30, 2021

STILL ONE MORE "Peace Place" dsp


This paper coordinates with the "Peaceful Cabin" stamp set.  I had seen a card that someone made and had adde the little "wolf" to the dsp.  I had to be careful not to get ink on the rim of the stamp.  The sentiment is also from that set of stamps.   I had used my MISTI to stamp the sentiment and thought I had it placed so it would stamp perfectly, but............it is uneven!  This wasn't one I could fix!

Thank you for coming by today!


Wednesday, December 29, 2021

MORE "Peaceful Place" DSP


While the package of paper is still on my table, I made this card this morning.  I had seen a card that had used the 5 1/4" x 4" piece on the white card base and decided it would be perfect to use along with the piece with the trees.   I had left enough space on it to add the sentient.  

I'm not sure that the picture shows that the black strip is actually a piece of black glitter tape that I had.  I didn't have any sheer ribbon to use but like the glitter tape just fine.

Thank you for coming by today!


CHRISTMAS CARD


I intended for this card to be on my blog Christmas Eve Day.  Unfortunately I got busy preparing food for supper that night and also food to take to our daughter's home on Christmas Day. 

Our Christmas Eve church service was beautiful!  For the first time in over 15 months the church bells rang out before the service started.  Because the Derecho in August of 2020 took down the steeple of our church, we hadn't heard the bells ring since then.  It gave me goose bumps hearing them again.  AND for the first time in a very long time our church was full.  (I have to admit I was a little anxious about having so many people there with the surge of Omicron variant showing it's ugly face now.)  On Christmas there is always a choir and soloists which topped off a very special gathering.  Insurance dictated that we weren't able to even be in the church sanctuary last year.  Services must have been held in the Parish Center.

I sincerely hope you had a special Christmas like we did.  We managed to make it a very special one for our grandchildren and also had a lot of fun with gag gifts given and received.

Now that busiest time is over for us, I hope to get back to making some cards again.  It's not that I need any more, but I like to have something fresh on my blog almost every day.  We'll see what I come up with.

It won't be long though until I may need to take a break here.  For the first time in years I will need to hire someone to do our income tax return and the returns for my mother who passed away in April.  That will require me having my information in a lot better format to take to the accountant instead of just looking at my computer as I prepare the returns myself.

Thank you for coming by today!


Tuesday, December 28, 2021

HAPPY BIRTHDAY, LYNETTE!

As I opened my blog page I just realized that I haven't posted anything since last Tuesday!  I had things lined up to post but forgot to do it in all of the chaos of holiday preparations!  You might just get to see them anyway this week since I don't have anything else lined up.  Today though I have posted the card that I sent to my friend, Lynette, for her birthday.  I sent it way early so I wouldn't forget to do that and knowing that she wouldn't be opening her cards until today.  (Who else has the ability to not open cards right away when they arrive?  I don't.  lol)


This paper really has to be seen in person to fully appreciate just how beautiful it is.  The tree branches have a metallic silver like snow.  The piece piece with the trees and the gray dsp in the background are from the Stampin' Up! "Peaceful Place" package.  Perfect for this time of year!

Happy Birthday, Lynette!  I hope you have a very special day!

Monday, December 20, 2021

FESTIVE FOLIAGE


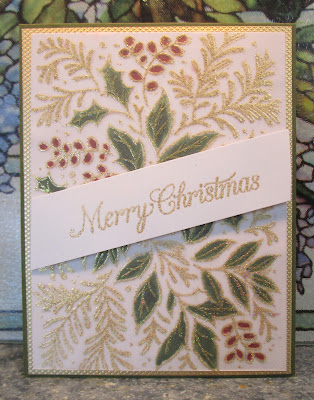
This first card is actually much prettier in person.  The picture doesn't do justice to the gold embossing.
After embossing with gold powder I colored with blenders.  I then matted this one with gold card stock and then added it to the green card stock.  A stamped the Merry Christmas on a long scrap of white card stock, laid it on the front of the card and marked the angles so I could cut it with my trimmer.  It was added with a foam strip.


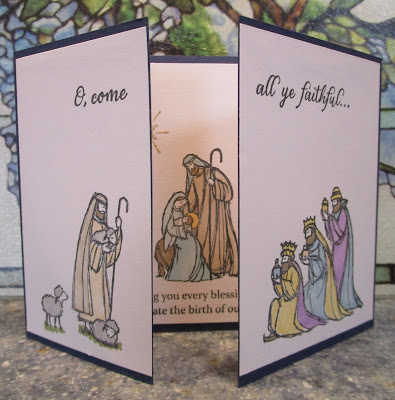
For this one I decided to just stamp the design with Memento Tuxedo Black ink and the color with blenders.  When it isn't along side of the one with the gold embossing I like it fine.

Five more days to Christmas and I'm having to make a last trip to town to HOPEFULLY find the last of what I need for gifts......mostly gift cards......but making several stops.

As I mentioned in an earlier post, I have been busy making cookies and treats.  To date I have made 

1.  A triple batch and a single batch of a snack mix
2.  Double batch of Peanut Blossoms
3.  Double batch of cut-out Christmas cookies
4   Four batches of a recipe called "Mama's Candy" 
5. Lots of white chocolate and chocolate dipped pretzels and pretzel rods
6.  Pretzels with the Rolos and pecans (these disappeared very quickly)
7.  Spritz to use my cookie press (they didn't come out well so I just make drop cookies.)

Still to come: Cornflake cookies, unbaked chocolate/oatmeal cookies, and cheese balls.

We do share a lot of what I make and still manage to eat too much of it.......but it's only once a year.

Thank you for stopping by today!


Friday, December 17, 2021

HAPPY BIRTHDAY, SHERI

I have been so busy getting our Christmas/Holiday cards ready to mail along with baking and making treats that I forgot to post the two cards I had scheduled for yesterday.  You will be able to see them next week but for now.............


The "Peaceful Place" dsp from Stampin' Up! is all done in shades of gray with beautiful trees.  The sheet I used for this had 4 sections so that is where I started by cutting up the sheet into four squares.  Each of those squares can then be used in a couple of different ways.  The rest of this square will be on a post next week.

I matted this strip with Basic Gray card stock and then added it to the front of the card base which left the perfect space to stamp the vertical "Happy Birthday".  

The base was a light weight card stock.  Inside I added a 4" x 5 1/4" piece of the Basic Gray card stock   and then a 3 3/4" x 5" piece of white for the sentiment and signature.  This card was sent to one of the members of a card group I belong to.

Thank you for coming by today!


Wednesday, December 15, 2021

CHRISTMAS CARD USING SU VASES

l

Last year I saw a card that used one of the vase stamp sets from Stampin' Up! and thought it was a fun idea.  I prepared four of the pieces on the white card stock but didn't finish them until recently.  It makes kind of a non-traditional Christmas card but I like it.

Thank you for coming by today!


Tuesday, December 14, 2021

USING UP VARIOUS CHRISTMAS/HOLIDAY DSP


My friends liked the idea of doing these cards with a variety of the holiday papers I had in my stash.  This is just one of them.  They are very simple, but by adding the strip of glitter paper it made them more festive.  I didn't think to take pictures of some of the other papers we used before delivering them.  I'm not sure how many we made of these but I think it was somewhere between 90 and 100.  They were delivered to two nursing homes for the staff to sign and give to the residents.

Thank you for coming by today!


Monday, December 13, 2021

STAMPIN' UP - Toile Tidings designer series paper


I believe this designer series paper was from last year but not sure.  It is double sided with the same exact design on the opposite side but in red.  (I don't like the red side.)

The scenes on the papers are what attracted me.  There were two each of three different patterns of this type of scene, one with foliage, one with stripes and one with plaid.  

My friends and I made 44 of these cards for the independent living center where my mother had lived for 9 years and I made a couple more to send to friends.  The papers with the scenes are nearly used up but I have a couple of sheets with the foliage and some of the stripes and plaid left.  I hope to get those used up soon and put the cards aside for next year.

Thank you for coming by today!

Sunday, December 12, 2021

HAPPY BIRTHDAY, ASHLYN!

I almost forgot to post this............


Today our second oldest granddaughter, Ashlyn, turned 21!!!!  How can that be? I try to make the cards for the grandkids a little more than just the standard A2 card.  The paper is from a sheet I bought at a local craft store.  I had some pieces of this dp left from another project and decided it would work for one of these types of folds.  Balloons are good for all ages!

From the scraps, I fussy cut out the four balloons and added three to the front and one inside above the "celebrate" die cut.  The white area didn't leave much room to write a message but I'm sure she was more interested in the $'s that were inside anyway.  We always call them to visit on the phone so we didn't need to write a long note in the card.

Thank you for stopping by!


Friday, December 10, 2021

STAMPIN' UP! - Santa's Sleigh Stamp Set - #3


The deer is from the SU set but the tree is from a Tim Holtz die set.  The pretty dsp is from Stampin' Up! "Beauty of Earth" paper package.

Christmas Eve is two weeks from today!  Are you ready?  I know I'm not.  Always something more to do.

Thank you for coming by today!


Thursday, December 9, 2021

STAMPIN' UP! - Santa's Sleigh Stamp Set - #2


I already had all of these pieces die cut so decided to make another card.  The head of the deer doesn't show up the best with the white on white.  It might have been a good idea to sponge some brown on the antlers.

Thank you for coming by today!


Wednesday, December 8, 2021

STAMPIN' UP! - Santa's Sleight Stamp Set - #1


I watched a video where the demonstrator used this stamp set.  Her card was different but I wanted to use one of her ideas.  She die cut the trees and covered them with VersaMark ink.  Next she sprinkled "Sticky Stuff" on them and heated them with a heat gun.  Glitter was sprinkled over the sticky areas and then heated again to set the glitter.  I had a container of the "Sticky Stuff" for several years and had forgotten how it was supposed to be used.  I love what it did for my trees.  The rest of my card is a combination of things I saw on Pinterest.

Thank you for coming by today!


Tuesday, December 7, 2021

STAMPIN' UP! - Evergreen Elegance - 2 cards


Very clean and simple card, but I really love it.  I saw the idea on Pinterest.


This was actually the first piece I stamped with the greenery, but I soon discovered that there wasn't room for the Merry Christmas sentiment that I used on the card above.  This one worked great instead.  I matted it with a slightly larger piece of Evening Evergreen card stock and added it to the white card base.  I like this version as well.

Thank you for coming by today!

Monday, December 6, 2021

CASING SU DEMONSTRATOR, Mary Fish


I follow the blog Stampin' Pretty by Stampin' Up! demonstrator, Mary Fish.  Her December 3 blog post was showing samples of cards made with items that are being discontinued.  When I saw the card I have CASED here, I was surprised to read that the flower was made with the vase punch.

The card base is Chocolate Chip with a Calypso Coral mat (4" x 5 1/4").  The white layer (3 3/4" x 5") was embossed with the Subtle 3D folder.

I used a circle die to cut out an area on the white layer and added the dsp behind it.  Using a scalloped circle slightly larger I cut the scalloped piece.  Before adding the flower, I looped the gold thread and fastened it to the card with two large glue dots which also held the flower when I added it.  

The short vase design on the punch was used to get 10 "petals".  I assembled them on a circle by placing the outer petals first and then the 4 on top of them.  I also lined the envelope with the dotted designer paper.

You can find the tutorial on her blog here:Vase Builder Punch Flower

Thank you for coming by today!


Friday, December 3, 2021

ANOTHER POINSETTIA PETALS CARD


Since there was a left over piece of some Tidings and Trimmings dsp and the dies were still on my craft table from yesterday's card, I decided to see what I could make.  I wasn't sure about the Misty Blue for the flower but it is one of the colors in the designer paper.   I really like this card and am pleased to say I did not copy this one from anyone.  

Thank you for coming by today!


Thursday, December 2, 2021

POINSETTIA DIES and TIDINGS AND TRIMMINGS

I almost forgot to post something this morning!


I can't take credit for the basic card because I followed a video and made this one.  I did use the Evergreen Elegance Chevron because I didn't have the sheer ribbon she used.  I also used the little die cut center for the Poinsettia instead of gems.  

Interesting idea:  The flower dies have an outline and also a die for cutting and embossing the petals.  The dies fit together perfectly so the demonstrator used Press and Seal on the back side of them to hold them together and keep them that way.  What a clever idea!  That the second time I've heard of someone using Press and Seal.  Mine has been in my cupboard for a very long time and now I have a use for it with my cards.

Thank you for coming by today!


Wednesday, December 1, 2021

TIDINGS AND TRIMMINGS - Twist and Pop Card


I'm pretty sure I already have more Christmas cards than I'll need but I'm really having fun with the pretty papers, stamps and dies that I have.  My husband was playing cards Monday night so I sat at my craft table and checked out some videos.  I've seen this "Twist and Pop" card for various occasions but saw one made with these papers that I have.  It turned into quite a project since I made one along with the video by stopping and pausing. After a little over 2 hours I had completed this one.  

The video was well done by Cindy Brumbaugh on YouTube.  I really like how it turned out and it was actually easier to make than I had anticipated especially since I had the same papers as she had used on one of her samples.  I left off a sentiment from the front.

The draw back of the card is that it ends up being very thick.  In fact, it's more than 1/4" thick because it would not slide through the piece I have from the post office to measure items I mail.  Recently I received a card from a friend and the postage was over $4.00!  Her postmaster made her pay First Class Package rate to send it because it was more than 1/4" thick.  I really don't usually hand deliver any cards but I think I will give this to the guy who cuts my hair when I'm there next Wednesday.  (See inside below.)

NOTE:  I might be able to reduce some of the thickness by not popping the stocking and star pieces  with foam squares on the inside.  I might have to give that a try if I make another one.


My card doesn't lay flat when I open it but I'm not sure if it is supposed to.  It was difficult to get a good picture of it but I think you can make out the images pretty well.

Thank you so much for coming by today!

UPDATE:  I just returned from the post office.  It would cost $4.60 to send the card due to thickness and that when it's in the envelope it is rigid and not even thickness.  I'll be hand delivering this one.

Tuesday, November 30, 2021

TIDINGS & TRIMMINGS #2


I'm not sure but I think the video I referred to yesterday showed making two cards with the same papers.  Anyway, this is the 2nd card I made with the stamp set and retired designer papers.  See the inside of the card below.


 There is a lot of room inside to write your message or stamp a sentiment on one of the sections.  I do like this card better than the one I posted yesterday.

Thank you for stopping by today!

Monday, November 29, 2021

TIDINGS & TRIMMINGS

I hope all of you had a wonderful Thanksgiving weekend!  We feel so blessed that our family lives with in a few miles so we don't have to fight the traffic of crowds at the airports.  Now it's on to Christmas and Happy Holiday cards.


When I made this card several weeks ago, I had used the idea from a video I saw - I believe on YouTube.  It's a fun stamp set to work with and I had some retired designer paper that went great with the stamp set.


 Inside

Thank you for coming by today!

Friday, November 26, 2021

FEELS LIKE FROST designer series paper


The papers in this 6" x 6" pack are just gorgeous!  One side of the sheets has beautiful snowy scenes.  The reverse sides of the sheets have silver foil designs.  So far I haven't used any of the reverse sides.

The beautiful papers don't need much of anything added to create wonderful cards.  This is one of my favorites.  (See a second card below)


I was hurriedly adding the designer sheets to the navy mats and then onto the card bases.  I wasn't paying enough attention and then realized I had glued this one on upside down!  I just reversed where I stamped a sentiment and I think it works OK but I do like the first card the best.

How many of you are out doing Black Friday shopping?  I haven't done that in a lot of years but I hope you are finding some great deals!  Our daughters are grown and the grandchildren have such specific requests that we have now resorted to gift cards and a check made out to them to apply it to the things they want.

Thank you for coming by today!


Thursday, November 25, 2021

HAPPY THANKSGIVING!


The die for this card is from Tutti Designs.  It's a little fussy to work with because I had to cut the design in green and then again in orange for the pumpkins.  The pumpkin portion was then trimmed out of the entire die cut and added to the green vine using Bearly Art glue.   I love the fine tip of the liquid glue when working with the delicate die cuts.

Wishing all of you a Happy Thanksgiving and if possible I hope you can safely enjoy it with family and/or friends.


Wednesday, November 24, 2021

POINSETTIA PETALS


Most of the time I don't know what I'd do without idesa from blogs I follow, Pinterest and YouTube to get me motivated for making a card.  When I saw a card like this, I just knew I had to make one (or two).  I had all tof the same papers, stamps, dies and embossing folder.  This first one is different because I didn't cut down the Soft Succulent to use as a mat.  I did add some gold "berries" under the flower too just to dress it up a bit.

The second card is stepped up by matting with the Soft Succulent card stock and then adding it to the Evening Evergreen card base.  I really like this one.

Thank you fro coming by today.


Tuesday, November 23, 2021

STAMPIN' UP! Evergreen Punch


I saw a card on Pinterest (surprise, right?) and I loved the simplicity of it and the colors.  The designer papers are from the 6" x 6" Tidings of Christmas designer paper pack.  The card stock colors are Cherry Cobbler and Evening Evergreen.  My card is a little different because I stamped the "Merry Christmas" across the piece rather than embellish it.

Thank you for coming by today!

Monday, November 22, 2021

GATHER TOGETHER


Now and then I would think about the priest who married Gary and I.  I used to think it would have been nice to see him again but I knew he had gone into the Navy.  Still I would think about him especially on our anniversaries and as we would drive by the church where we were married.

Yesterday there was a sheet in our church bulletin that had the addresses of all the retired priests from our Archdiocese.  I was so excited when I saw his name and address.  Because of all the cards my friends and I make to give others and the cards I send to the local people in living centers/nursing homes, I started sending cards to the priests who have served our parish.  I have now added a new address to my list.

I immediately sat down and typed out a letter to him to thank him for his service and to let him know that we were still married after 53+ years and feeling blessed to have the life we have.  This is the card I sent him with the letter.

Thank you for stopping by today!

Saturday, November 20, 2021

STAMPIN' UP! - "Feels Like Frost" dsp


Even though I tend to look at these papers and think of Christmas cards, it is also very appropriate for birthdays or other occasions.

Thank you for coming by today!


Friday, November 19, 2021

STAMPIN' UP! - "Feels Like Frost" designer series paper


This piece of the paper just makes me think of a cold winter night - pretty to look at from your nice warm home.
Thank you for coming by today!


Thursday, November 18, 2021

STAMPIN' UP! - "Feels Like Frost" dsp


 The "Feels Like Frost" designer series papers are so pretty!  This is a card that I had started last year but finished up a few weeks ago.  The papers are 6" x 6" and make such beautiful cards. You'll be seeing more of them eventually.

Thank you for coming by today!

Tuesday, November 16, 2021

STAMPIN' UP! - Boho Medley Birthday Card


I really like how this one came together.  I love the papers from the Boho Medley packages that I purchased.  This is basically a CASE of one I saw on Pinterest.

Thank you for coming by today!


Monday, November 15, 2021

STAMPIN' UP! - Paper Pumpkin "Hello Pumpkin" Thanksgiving card


There is a lady in our town who has been ordering cards from me now and then.  Friday she called and said she would like three Thanksgiving cards and a birthday card.  Since it was possible she would be sending one of the cards to the same person I am, I decided to make hers completely different than the cards I made for my mailing list.

I used a 4" x 5 1/4" piece of the SU Beauty of the Earth designer series paper for the mat.  I cut the frame from an unbranded die using the SU Cajun Craze card stock and then a second one with white card stock.  The cute little embellishments were added to the white pieces and then added back into the framed areas.

Tomorrow I will be showing you the birthday card she purchased.  Thank you for coming by today!


Friday, November 12, 2021

HAPPY BIRTHDAY, ABBY!


Our 4th granddaughter, Abby, is turning 18 today.  I made this Tower Card a few weeks ago and decided to save it for her.  I've been trying to make cards for the grandchildren that are fun folds or at least not just a standard A2 card.

This is the view of the card looking down a bit onto the top.  Some of the videos suggested that by using designer paper for the "core" of the card, it helps keep the piece from becoming too thick.  I liked the idea.

Below you will be able to see each of the four sections.


 Thank you for coming by today!

   These are two cards I made using the second format from Robin Armbrecht's video.  (You can see a link in yesterday's post.)  I li...