Friday, January 30, 2015

MEMORY BOX - Lucienne Tile Border

 
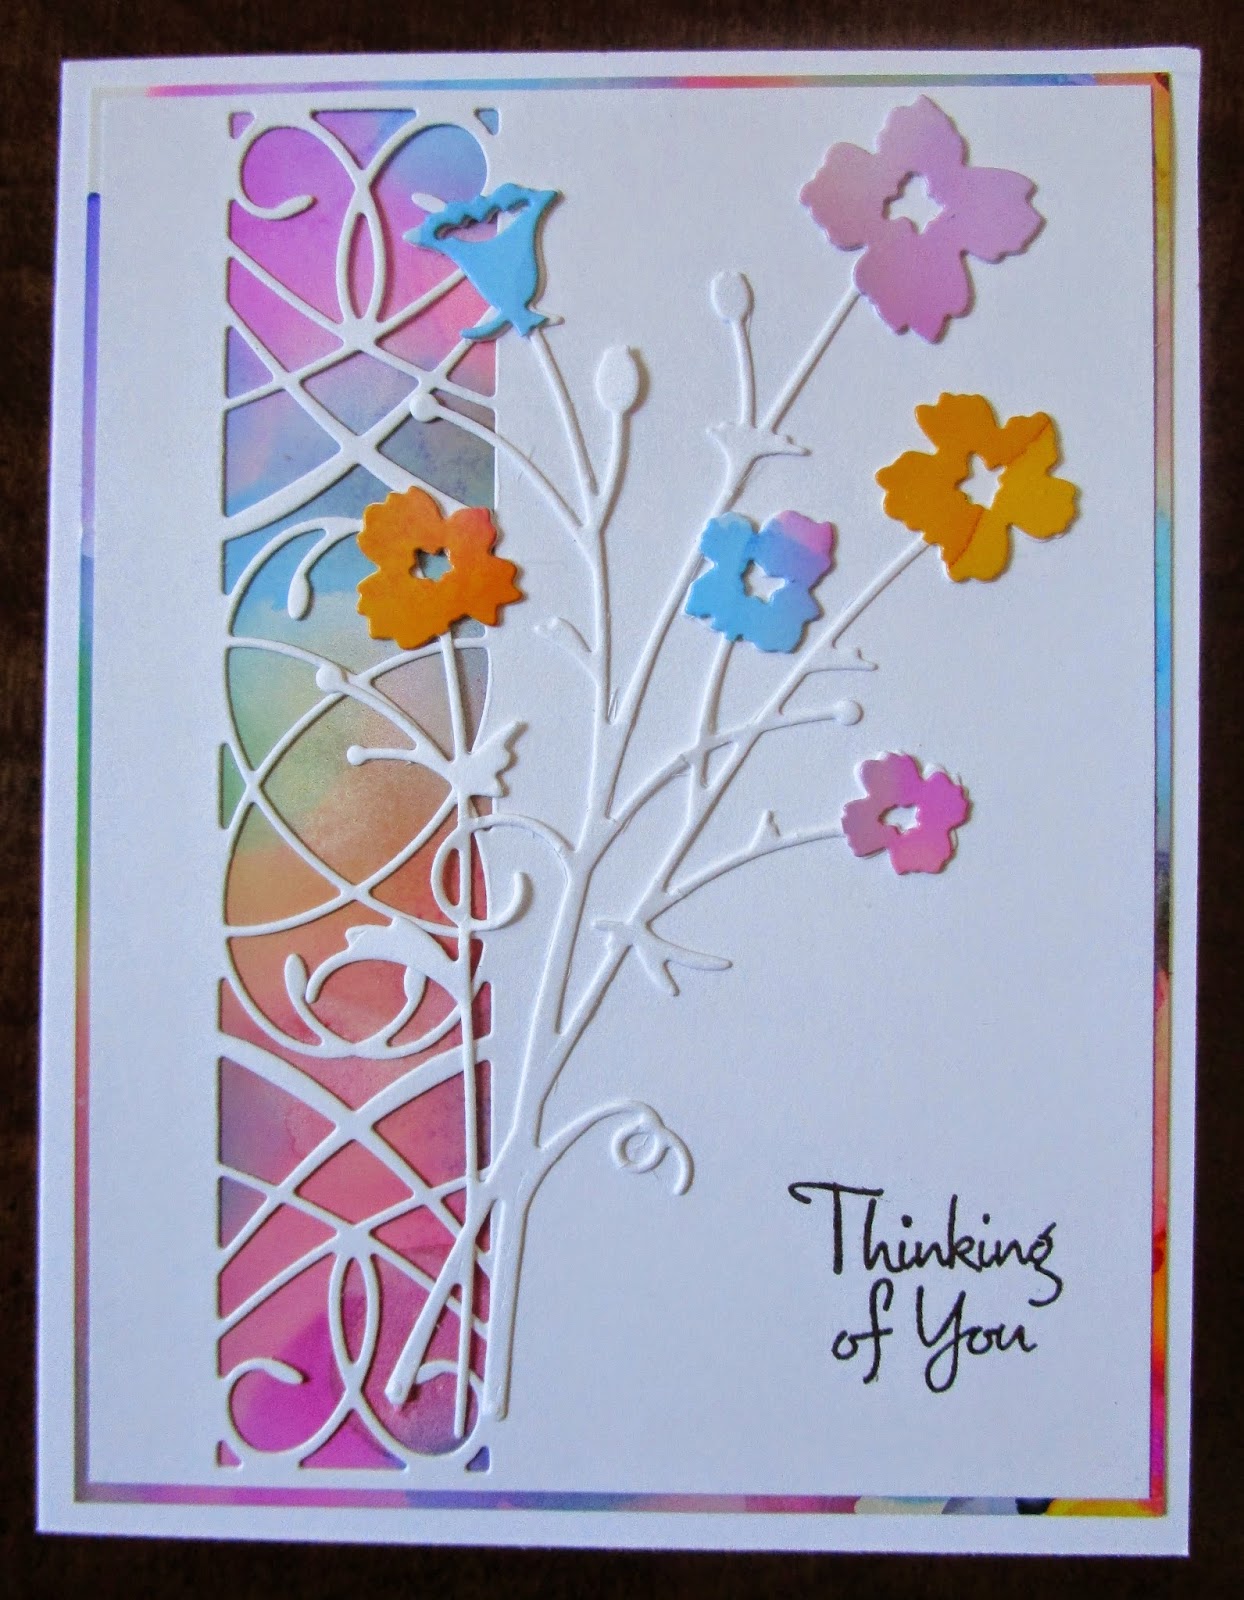
It's late in the day, but I decided I couldn't wait until Monday to share this card.  First, there is a little history......I saw a card that someone had made using this Lucienne Tile Border and I thought the design was just beautiful!  So I headed to the Internet to purchase one.  Site after site was sold out but then I found one on Amazon.com and it was the last one they had.  I purchased, paid and was so excited.  A few days later I got a refund for the full amount.  Evidently their inventory was not accurate!!!  I was so disappointed.
 
The first place I had looked was eBay but the only thing I found there was someone who was selling the die cuts.  I decided to go back to eBay and there was ONE but it was in England.  Thankfully she had a Buy It Now price on it so I jumped!!!  We had quite a time getting the payment taken care of, but the seller was superb and patient.  Today the die arrived and I had to try it immediately!
 
My yesterday's post mentioned that I had done some other background designs using Alcohol Inks.  The one on this card was going to be thrown away yesterday but it was still on my table.  The overall look was not good but when I put the white layer on top of the glossy paper it was beautiful with the part that shown through the die cut and just the edges. 

I then cut a sprig of flowers with a second Memory Box die.  After I adhered it to the front of the card, I took sections of the leftover inked background and cut individual flowers.  The yellow flowers appear more orange than they are but I couldn't get a picture that satisfied me.  This die is one of my favorites and I know I'll be using it a lot more.
 
Since you took a moment to stop by my blog today, won't you tell me what you think?   I always appreciate your comments!!!  Have a great weekend!

Thursday, January 29, 2015

AN EXPERIMENT


Yesterday I saw a technique that Heather Telford used and I decided to give it a try.  The background she created was much prettier.  Heather used Distress Stains and applied them to wet Watercolor Cardstock allowing them to bleed together.

I didn't have Distress Stains so I wet the Watercolor Cardstock and then dropped alcohol ink colors onto it.  When the piece dried I was tempted to throw it away.  However, I decided to go ahead and trim the piece down and used a Memory Box butterfly die to make the design in the middle.  Heather had explained that she only partially cut the butterfly from both sides so that it remained a part of the colored layer.  I then matted it with shiny black card stock and then onto a piece of yellow card stock.

Before adding the image to the card base, I stamped a small "Happy" and then added a die cut "birthday".  I'm OK with the final card but it isn't my typical project.  Alcohol inks are a lot of fun to work with so while I had my them on my table I did some more backgrounds which will show up on future posts. 
 
Since you took a moment to stop by my blog today, won't you tell me what you think?   I always appreciate your comments!!!  Have a great day!


Wednesday, January 28, 2015

RED AND WHITE CARD SWAP

 
Our Yahoo Groups January color swap was "Red and White".  I thought about making a Valentine so my partner could use it in February.  But then I decided to make an "all purpose" type of card.  I pulled out this beautiful die from Paper Trey and found a red and white dp from a paper pad I have.  You can't get a more CAS design.  I lined the envelope and then sent the set to my partner in a second envelope.

 
Because I was going through my paper pads, I found this pretty paper and decided to make a second card.  I can see myself making a lot more cards using this die because it is a quick and easy way to use up a lot of papers from my
huge supply of papers.
 
Since you took a moment to stop by my blog today, won't you tell me what you think?   I always appreciate your comments!!!  Have a great day!

Tuesday, January 27, 2015

PP229 CHALLENGE - Stampin' Up! Designer Paper


My second post today.........Many days I  have a hard time coming up with an idea for a card layout.  Lately I have been watching more challenges and it really helps to sometimes get the juices flowing.
 
The Paper Players have the challenge above this week and it was one I knew I could do easily.  I also have SO MUCH paper that needs to be used.  The designer papers I used for my card are from a retired paper pack and when I send this card it will be sent with a coordinating lined envelope.  And of course, the Memory Box butterfly finished off the card in a clean and simple way.

STAMPIN' UP! - Lotus Blossom

 
Yesterday I posted a CAS card for the "Less is More" challenge.  I have always liked doing 2 or 3 step stamping.  The SU Lotus Blossom set has three stamps to do the blossom.  The stamps are all clear so it is pretty easy to line them up as you do each step.  While I had the stamp set and supplies on my table, I decided to make another card.
 
Since I had a hard time finding 2 or 3 different inks that coordinated nicely to do the steps, I used only Melon Mambo.  To get the 2-step look, I simply stamped off the first design once and then onto my card layer.  Then I stamped the second design right onto the layer.  The stem was done the same way using Wild Wasabi ink.
 
I then matted the design with Wild Wasabi and then off set it on another layer of Melon Mambo.  I wanted to get a little more of the green onto the card so I used a strip of Wild Wasabi dp behind the entire design.  I noticed a small smudge of ink just above the one blossom so I quickly die-cut a tiny butterfly to cover it up.
 
I always appreciate your comments, so while you are here won't you take a moment to tell me what you think?  Thank you so much for stopping by!

Monday, January 26, 2015

LESS IS MORE CHALLENGE


When I went through my emails after lunch today I found a challenge that would be so easy to do and I hadn't made a card for today's post yet. 
 
This is the challenge:  "Less is More": Week 208 Sketch time
 
I used the Lotus Blossom stamp from Stampin' Up!  Colors are SU Melon Mambo and Wild Wasabi.
 
Your comments are always appreciated so while you are here won't you tell me what you think?  Thank you for stopping by!

Friday, January 23, 2015

HAPPY BIRTHDAY, PAM!

 
My best friend from high school is celebrating her birthday today.  This is the card I made and sent to her.
 
The stamps are from the new Stampin' Up! Butterfly Basics set.  The picture doesn't show it but I stamped a "honeycomb" type design on the layer using River Rock ink as kind of a shadow.  The next step was to add the fern leaf.  I used Wild Wasabi ink and stamped it off once lightly before adding it.  I wanted it to appear to be behind the flower and since I would be coloring in the flower design, I didn't have to mask an area.  The flower was colored with Tangerine Tango and Wild Wasabi.  The Memory Box butterfly was the final touch before matting the design.
 
I always appreciate your comments so while you are here, let me know what you think.  Thanks for stopping by!

Thursday, January 22, 2015

THREE CARDS TODAY - Using Doilies

Card #1
The picture below shows my first attempt at casing a card I saw on Pinterest.  I loved the sentiment from the Stampin' Up! Butterfly Basics set.  The picture makes the sentiment look blurry.  I had the half of one doily already so used it and cut a circle of SU dp to add to it.  On an A2 size card, it didn't look right so I cut the card down on the top and bottom edge making it close to a square card.
 
I wasn't real happy with this card so...........
 

Card #2 
I took a second doily out but used more of it on the card which helped.  I changed the sentiment, SU dp and butterfly color used.  I also rounded the corners of the right hand edge to give it a softer look.  I liked this one much better.

 
Card #3 - My Favorite
My third try was a success.  I changed the card base to coordinate with the Island Indigo color in the dp.  The yellow butterfly was a nice bright finish.  While I was making cards this past weekend, I decided to start lining envelopes more often..........I have way too much paper and it really makes a wonderful presentation for the card. 

 
The doilies and dp used on these cards are from Stampin' Up!
 
I always appeciate comments that are left on my posts, so while you are here, won't you let me know what you think?  Thank you for stopping by!

Wednesday, January 21, 2015

MEMORY BOX DIES


I embossed the front of this card first with the Dotted Swiss folder.  There are four different dies used to do the rest of the design......Zinnia Bouquet (98783), Zinnia Bouquet Background (99784), Solid Arch Background (98992) and Bubble Arch (90017).  I added the little bow of sheer white ribbon.
 
I always appreciate your comments, so while you are here won't you tell me what you think?  Thanks for stopping by!

Tuesday, January 20, 2015

GET WELL SOON

 
One of my friends from the Yahoo Group just had knee surgery and I wanted to send a card to her to let her know I was thinking of her and trying to brighten her day.   The Memory Box flowers were done on a piece of white card stock and then inserted behind the window opening of the front of the card.  The sentiment was stamped and then I used the Spellbinders Fancy Framed Tags Die set to cut it out.
 
Thank you for stopping by!

Sunday, January 18, 2015

THE PAPER PLAYERS #228, CAS-OLOGY CHALLENGE & NBUS CHALLENGE #3

 
I was busy making card yesterday and decided to make one for three more challenges. 
 
You can find all of the cards posted for the challenges here: The Paper Players Challenge #228,  CASology, and NBUS Challenge #3
 
I sponged the three colors onto the card stock and then stamped the sentiment over it with the black ink.  Using a Spellbinders Labels Eighteen I cut and embossed it.  This was added to the card front with foam dots.
 
Thank you for stopping by!


Friday, January 16, 2015

SPELLBINDERS FEATHERS - NBUS Challenge #3


Recently I became aware of a challenge called NBUS (Never Before Used Schtuff) and I have A LOT OF THAT!  Yesterday I made a card for a challenge and decided it would be fun to try another one -- this time for NBUS.
 
Feathers seem to be very popular right now and I had ordered the Spellbinders feather sets a while back.  But as I do so many times, they got set aside with a lot of other things that I have not used yet.
 
For inspiration I turned to Pinterest.  First I cut and embossed the feathers - 2 from one set and 1 from the other.  I sponged them with Stampin' Up! Crisp Cantelope and Brown Sugar inks. 
 
Next, I cut a piece of white card stock (4" x 5 1/4").  A couple of years ago I bought some "Cover-A-Card" cling background stamps from Impression Obsession.  The background on the top of the card was made using the "Scratches" stamp.........another item that had never been used.
 
I added a piece of Stampin' Up! burlap ribbon which was on my table and then stamped the "Happy Birthday" sentiment.  The cluster of feathers was attached and a bow made of "twine" was attached with a glue dot.
 
You can see the challenge here: NBUS Challenge #3  You may need to scroll down to see the qualifications to participate.
 
This card met the qualifications for the challenge but it also meets a request for a card that my mother needed for the husband of one of her granddaughters.  He is a hunter and I thought the feathers might be appropriate.
 
I always appreciate your comments so while you are here, let me know what you think.  Thanks for stopping by!

Thursday, January 15, 2015

PAINTED PETALS FOR PPA236


I had a card in mind to post today, but when I was reading my emails this morning I saw the message about the Pals Paper Arts Challenge first challenge for 2015.  It's been a long time since I've participated in any challenge but I knew it was one I could do and had a great idea for the stamped design.

This is another stamp from the Stampin' Up! Painted Blossoms stamp set.  First I went through my designer papers that coordinate with the Stampin' Up! card stock and found two colors that I love.  I stamped the design with Perfect Plum and Wild Wasabi.  The mat and little tags are made with those same colors.
 
When I started to put the card together, I decided to use the strip with the dots across from that same stamp set.  I have a Cuttlebug embossing folder that is a strip of dots that went so well with the stamped dots.

See all of the cards created for this challenge here:   PPA236: A Sketch Challenge
 
I always appreciate your comments so while you are here, let me know what you think.  Thanks for stopping by!

Wednesday, January 14, 2015

MORE PAINTED PETALS

 
I thought I had a card scheduled for today and just discovered there wasn't one.  I made this card a couple of days ago using the SU "Painted Petals" stamp set that is now available.   I used SU Wisteria Wonder ink, card stock and dp.  The embossed edging is from one of the SU Delicate Designs textured impressions folder. 
 
Stampin' Up! now has a pretty butterfly die set that coordinates with the Basic Butterflies stamp set which I will try to experiment with soon.  I already had a lot of butterfly dies so I used a Memory Box die for my card.
 
Thank you for stopping by!  I hope you enjoy seeing the new stamp sets from SU.

Tuesday, January 13, 2015

STAMPIN' UP! - PAINTED BLOSSOMS DP

 
When I received the SU Painted Blossoms designer paper package and saw that two of the sheets had this large pattern over nearly the whole piece, I wasn't sure that I would be able to use it even though it is very pretty.
 
So when all else fails, I set off for Pinterest.  I found that by isolating certain areas of the paper, I could make a card with very little effort.  I mounted a piece of it on a card base from the new Blackberry Bliss card stock (one of the newest In Colors).
 
I then used a Memory Box die for the butterfly and a Spellbinders die for the Happy Birthday.  And just that quick I was finished! 
 
So what do you think?  Thanks for stopping by!

Monday, January 12, 2015

BIRTHDAY CARD

It's a small world!!!  The mother of a boy I knew when I was in Junior High and High School lives in the same Independent Living Center as my mother.  He was my "first date" I guess because I had invited him on a hay rack ride when I was in 8th grade.  He was from a neighboring town and we wrote back and forth for a while. 
 
Last year my mother's friend started having me make greeting cards for her.  This is the card I had made for her to send to her son.
 
 
This year she wanted a birthday card for Darrell again and I wanted to continue with the music theme for him.    The card below is the one she will be sending to him the end of January.
 
 
The dies are all from Memory Box.   I placed a second "Treble Clef" in the lower left corner of the inside.  Since the card is not quite as fancy this year, I decided to line the envelope with the same dotted black paper as the mat. 
 
Thanks for stopping by today!

Friday, January 9, 2015

STAMPIN' UP! "WORLD OF DREAMS"


Yesterday as the sun was setting, I happened to look out the window and the sky was just gorgeous in the West.  The sun was reflecting a pink color and the clouds that were moving in looked more lavendar than black.  I certainly couldn't create the beauty of what I saw, but it did inspire me to pull out these colors for today's card.  I used SU Wisteria and Pretty in Pink inks to sponge on the white card stock before adding the image with VersaFine Black Onyx ink.
 
Thanks for stopping by!

Thursday, January 8, 2015

STAMPIN' UP! PAINTED PETALS


Today's card was made using another of the new stamp sets - Painted Petals.  I debated about this one but I really like it.  The flowers were done using two stamps.  The stems were stamped with SU Old Olive Ink.  Using the Stamp-A-Ma-Jig to line up the blossoms, I stamped them with SU Daffodil Delight ink.  The dp is from a paper pack from SU that goes very nicely with several of the new stamps.

The Occasions Catalog will be good through early June 2015 and Sale-A-Bration will be in affect through March 31, 2015.  So if there is anything you are wanting before the end of March, you will be able to choose a FREE item from the SAB offerings for every $50.00 you purchase from the Occasions or regular catalog.  If you spend $100.00 you get two free items.

Wednesday, January 7, 2015

STAMPIN' UP! LOVE IS KINDNESS

'
 
 
This is one of the new stamps from the Occasions Catalog.  It is a single stamp but I inked the tulips separately from the sentiment.  I use Calypso Coral and Crumb Cake Blendabilities to color the image.  The dp is also Calypso Coral.
 
 
I don't think the card needs a lot of explanation, but please be sure to let me know if you have any questions.  And if you would like to order this stamp, just let me know.
 
Thank you for stopping by!

Tuesday, January 6, 2015

STAMPIN' UP! OCCASIONS CATALOG & SALE-A-BRATION


Do you remember me?  Yes, I'm still here but just haven't been doing much stamping through the holidays.  It's time to get back at it and enjoy all the "toys" I have.
 
The Stampin' Up! Occasions Catalog is now available.  There are some really great stamp sets available and this card was made with one of them - "Indescribable Gift".  It is a great set to use for Easter but can be used any time.
 
I cut a piece of Blushing Bride dp and added it to the white card front.  Then I added a piece of matching ribbon.  The knot was tired separately and added with a glue dot.  The design was colored with Blushing Bride, Close to Cocoa and Pear Pizzaz and then mounted on a piece of Pear Pizzaz card stock.  The final step was to add it to the card with foam squares and then add the tiny butterfly.
 
I need to discipline myself and schedule time to make cards again.  I will try to add more cards using new items from the Occasions Catalog.  Items will be available starting today through June 2, 2015.
 
During Sale-A-Bration (January 6 - March 31) for ever $50.00 you spend you will be able to choose a FREE item from the Sale-A-Bration brochure.
 
The Occasions and Sale-A-Bration items can be seen on the Stampin' Up! web site.  If there is anything you would like to order, please contact me. 

Thanks for stopping by today!

One of the cards made on  this  vi.deo used this stamp from the Flowing Flowers set.  This isn't a two-step design and I wasn't sure...