Wednesday, January 31, 2018

CASING Stampin' and Scrapin' in GJ


I follow Stampin' and Scrapin' in GJ and she has a lot of cards that I really like to case. Preparing financial information for tax returns was making pretty good progress so I needed a break.  Yesterday (January 30) she had a card that I decided to make.  You can check out her card to see the changes I made. I believe she used an embossing folder for the large snowflake but since I have a large die for a snowflake that is what I used.

I've had this Stampin' Up! stamp set for the mittens a long time and I think this is the first time any of them have touched ink.  The border at the bottom is one of the SU Wheels......which I had not used.  In fact when I got the wheel out I was trying to ink it with an ink pad.  That didn't work the best.  And even once I remembered to attach the ink cartridge it took several tries before I got the design added in a straight line.  The bottom edge of it didn't ink well so I just cut off that edge.

It had been a while since I actually made a new card and I told my husband that it felt like I was a beginning all over again.  

Thank you for stopping by today!

Friday, January 26, 2018

ALTENEW IRIS


I made this card quite awhile ago but had not shared it here yet.  I have some Iris plants and they are so beautiful but don't last long enough.  

I have been working on getting our finances up to date on my computer.  I tend to end up entering several month's information for several accounts in January to prepare for tax season.  Intentions are always good at the first of the year to do better but last year didn't work out that way.  I will also be preparing my Mother's information for her income tax, my daughter & son-in-law and also their daughter who is now employed. 

So I guess what I'm saying is that while I am preparing to complete four tax returns, making cards is going to be very irregular as well as posting things here.  

The best way to follow my blog is to sign up for the daily reminders so you will know when something new is posted.  

Have a great weekend and thank you for coming by today!

Thursday, January 25, 2018


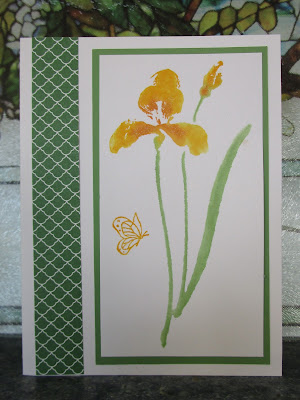
When I was going through my designer papers I found a small strip of this SU paper and used it for this card instead of the layout I used for the two previous cards.  It definitely makes a bolder statement.  I also added the little butterfly from an Inkadinkado stamp set.

Thank you for stopping by!

Wednesday, January 24, 2018

PENNY BLACK - Watercolored Iris #2


This is like the card I posted yesterday, but using the Stampin' Up! Garden Green card stock.

Since I'm short on new cards to post, I will add one more variation of this tomorrow.  

Thank you for coming by today!

Tuesday, January 23, 2018

PENNY BLACK - Watercolored Iris


I am a lover of Penny Black stamps.  Our Yahoo Group's second challenge for January was to make a card using a watercolor technique. This is the card I sent to my partner. The easiest one for me was to color this Iris with markers from Stampin' Up! and then spritz it with water.  

Last week a friend was here and we made cards for a nursing home and independent living center.  When we were finishesd, I showed her how to do this and she made several really pretty stamped images.

The image was added to the matching SU card stock mat. I left the right edge wider so that I could cut a design using a Martha Stewart punch.  I did add two scored lines along side of the punched edge although they don't show up in the picture.

I have more different cards made using this same stamp that I will be posting so I hope you will come back again.

Monday, January 22, 2018

ELIZABETH CRAFT PEEL-OFF STICKER - Glittered


Saturday I posted a card using one of these stickers which had been added to white card stock and colored. For this card I added the sticker to a double sided piece of adhesive, glittered the piece and then colored with markers.  

This particular set of stickers makes great CAS cards.

Thank you for coming by today!

Saturday, January 20, 2018

CLEAN AND SAMPLE CHALLENGE


I almost missed the  email for the STAMPLORATIONS Blog January CAS Card Challenge using an Elizabeth Craft peel-off sticker which was added to the white card stock, colored with markers and then matted with the black.  The stamp is from a set of Stampendous stamps.

Thank you for coming by today!

Thursday, January 18, 2018

CLEAN AND SIMPLE VALENTINE


I don't have a name for the die I used since there is no package for it.  I really like this design.  I don't think it needs description about the rest of it.

Thank you for coming by today!

Wednesday, January 17, 2018

IMPRESSION OBSESSION - Heart Flourish


To begin, I used the Martha Stewart Heart Scroll punch to cut the border.  The card base sat on my table for a couple of days then to decide where to go from there.  I embossed a piece of white card stock with the random dots folder and cut it down so it came up to the edge of the punched design.  A strip of red card stock was added to conceal the "seam".  

Last year I purchased the Impression Obsession die and had one of the designs in the package with the die.  It was a little too long so I trimmed down the design and added it with spray adhesive.  This card will be for our personal use.

Thank you for stopping by today!


Tuesday, January 16, 2018

VALENTINE Using all card parts


A long time ago when I purchased some new folders, I embossed some of each of them and placed them in a basket as samples. The embossed design is still another piece from my card parts that I decided it was time to use.  It was added to the white card base.  

The two fancy scrolls were pieces that I had cut from the Spellbinders Royal Love heart.  It was a shame to throw them away so I added them to the embossed design.  I still had a plastic bag with a bunch of punched hearts from last year and added one.  I ended up with a pretty Valentine and used some of my "hoard" of card parts.

Thank you for stopping by today!


Monday, January 15, 2018

POPPY STAMPS DIE - Heart Swoosh


This was actually the very first Valentine I put together this year.  I was trying to come up with an idea for the 97 cards we'll making for the care center and independent living center.

I really like this one using red glitter paper but I realized I didn't have enough glitter paper to complete the project. 


I remembered that months ago when I was already thinking about this project I decided I wanted to use some of the huge supply of Lasting Impressions papers that I still have.  What I like about this dotted paper is that has a white core so all I had to do was cut an 8 1/2" x 5 1/2" piece and fold it.  The border was cut with a Martha Stewart punch.  I added the Heart Swoosh with spray adhesive.  The solid color heart is simply the center of the "swoosh".

Once again I did't have enough of the dotted card stock to make 97 cards.  Plus I usually have things all cut and ready to assemble when we get together to make the cards.  Punching the border and cutting the dies one at a time was going to be pretty time consuming. These cards won't go to waste though because I'll be using them for my grandchildren.

Thank you for coming by today!

Friday, January 12, 2018

SPELLBINDERS "Royal Love" Die


Still another 4 1/4" x 5 1/2" piece in my card parts.  I added the heart design from the Spellbinders die.  The die actually cuts a design 5 3/4" wide so I trimmed off edges from both sides to fit on this card.


When I cut this design part of the card stock tore so I trimmed it down and added it to this 4 1/4" x 5 1/2" embossed design.  I like that the die is versatile in the way it can be used.

Thank you for stopping by!  Come back again next week for more Valentine ideas.
When I cut thi

Thursday, January 11, 2018

TWO CAS VALENTINES


When I found this embossed piece in my card parts it was a 4 1/4" x 5 1/2" piece so I added it to a white card base.  I simply added the three sizes of hearts.  Nothing all that spectacular but I think it will pass.


This was another of those 4 1/4" x 5 1/2" pieces in my card parts and added it to the white card base. I added this pretty little heart with spray adhesive.  The heart is from a Memory Box Peyton Heart die.

Thank you for stopping by!

Wednesday, January 10, 2018

COLOR SWAP CARD


Our Yahoo Group had a December color swap making a card with white and any shade of green.   I used the Poppy Stamps Snowflake Oval Collage die.  I cut the design from white card stock and placed a smaller piece of silver glitter paper behind it.  The next step was to double mat the piece and add it to a card base.  The green I used is Stampin' Up! Garden Green card stock.  I added a couple of white snowflakes from a set of Penny Black dies to finish off the project.  I think this will be a great design to use with various colors of card stock.

Tomorrow I'll begin showing some of the cards I have come up with for Valentine's Day so I hope you will take a moment to come back again.

Tuesday, January 9, 2018

"SNOWY" Scene


This will be the last "Snowy" card ...........at least for now.  I got the idea for this one from the back of the package that the die came in.  I cut the snowflakes with from the dies that are included with the "Snowy" die with glitter paper scraps that I had.

Thank you for stopping by today!


Monday, January 8, 2018

A CAS "SNOWY" CARD


This little guy is certainly fun to use, easy to color and bring a smile to someone's face.  Tomorrow I have one more "Snowy" card to show.

Thank you for coming by!

Friday, January 5, 2018

DISTRESSED SNOWDRIFT COLLAGE from Memory Box


A friend of ours who rents my mother's farmland is having a birthday this coming Monday.  He recently had shoulder surgery so I made this card with a dual purpose.   With the weather we are having snowflakes are certainly appropriate.  The outside lets him know that we are thinking of him but inside I stamped Happy Birthday! 
 
I have 11 more cards lined up to post do I hope you keep coming back.  Thank you for stopping by today!

Thursday, January 4, 2018

POPPY STAMPS "Evangeline Floating Square"


Although it's been a while since I have been posting regularly, I did enjoy the time reading and just taking it easy through and after the holidays.  Break time is over here.   It's time to get back to making cards and sharing.
 
I really liked this die when I saw it but then found it wasn't quite as easy to use as I thought.  However, I really like the card I came up with.
 
Rarely do I make square cards but this was the perfect time to do that.  I had some Yellow Bicycle (yes, that's the brand name) double sided designer paper with the snowflake design on one side and the "falling snow" design on the other. 
 
First I cut out the design using white card stock and then layered it on the dp.  I cut the design a second time using the snowflake side.  I trimmed away the "frame" which was no easy task cutting around the edges of those snowflakes  It would have been easier to just cut out the square instead but I wanted the snowflakes to stand out against the white frame.
 
So what do you think?  I have three more cards I'll be posting and then will begin showing you what I have come up with for Valentine's Day........some better than others but I was just experimenting.
 
Thanks for coming by today!

This is the  video  I used to make this card using more retired dsp. After I finished, I was a little dissatisfied with the white background...