Monday, February 28, 2022

CONGRATULATIONS!

One of our granddaughters is a manager for her high school wrestling team.  Recently some of the wrestlers from her school went to state and competed in their weight classes.  One of Abby's classmates won in his class.  She was overjoyed that he won and asked if I had anything to make a card about "wrestling" for him.  I didn't.

However, I have been boxing up stamps that I want to either sell or get rid of and remembered a mini stamp set that had a solid and an outline for a "blue ribbon".  I turned the outline stamp upside down and turned it into a medal. I colored with Copic markers in the school colors and even had a piece of scrapbook paper with the school name on it.  She loved it.  I was relieved!

Thank you for coming by today!

Friday, February 25, 2022

2 CARDS USING SU "Blackberry Beauty" DSP


For this card I added a Blackberry sheer ribbon around the matted piece before adding it to the card base.  


 In this package of designer series papers, there are two sheets with this design.  The sheets are designed so that you cut them in half and then cut each half into pieces that are 5 1/4" x 4" for an A2 card.

Instead of ribbon, i added a narrow piece of the Blackberry Bliss card stock.  Using dies, I cut out the sentiment and then added it to a scalloped die cut.  This type of card stock doesn't need much else to make a beautiful presentation.

Thank you for coming  by today!

Thursday, February 24, 2022

ONE LAST MAGNOLIA CARD


A couple of weeks ago I CASED this card from one I saw on Pinterest or YouTube but I didn't make a note of who made the original.   I really liked this one.

Thank you for coming by today!


Wednesday, February 23, 2022

MAGNOLIA DSP


Mary Fish, who is a Stampin' Up! Demonstrator had a care posted with these papers.  I switched the arrangement around a little and left off a sentiment but added the little sequins.  Tomorrow I will have one more card using the papers from this dsp pack.  I'm trying really hard to use up some of the retired papers that I have, but it just isn't going fast enough.

Thank you for coming by today!


Tuesday, February 22, 2022

STAMPIN' UP! - Magnolia dsp


I don't have the exact name of this dsp because I am packing things up so we can put new flooring in our computer/craft room and paint the walls.  No, I'm not doing it......we are definitely hiring it done.  It is going to be a lot of work getting everything out of here but praying the end result will be well worth it.

I've made one of these cards before but put the folded back portions along the long side of the card.  I like it done this way too. The piece with the "Enjoy Today" does not come out.....it is adhered behind the dsp.

Thank  you for coming by today!


Monday, February 21, 2022

STAMPIN' UP! - BeDazzling card stock


Yesterday we had a really nice day around 51 degrees. From the weather report last night it sounds as if we are in for some freezing rain/ice later today going into tomorrow!!! "Old Man Winter" isn't quite finished with us so I thought I would post a Christmas card.  

Quite frankly when I saw this paper in the catalog, I never thought that I would want it.  Then I saw a card made like this and I decided to find a pack.  Since it was no longer available I had to find it on eBay.  I didn't have the right card stock for the base but what I used seems to look just fine with it.  I really love the sparkle of the BeDazzling paper.

Thank you for coming by today!

Friday, February 18, 2022

COLOR AND CONTOUR STAMP and SIMPLY MARBELOUS DSP


For this card, I chose the Balmy Blue piece for the dsp and the blender for coloring the flower.  I added a couple of tiny gems to the piece with the sentiment and then popped it with foam squares.

Thank you for stopping by today.


Thursday, February 17, 2022

STAMPIN' UP! - Daffodil Afternoon


This card really doesn't need much of an explanation.  It's another great designer series pattern. The piece of designer paper is double sided.  I cut about 1 1/2" from the bottom and then just flipped the bottom piece over to show the reverse side.  The ribbon I used is the Pale Papaya sheer ribbon.  "Thinking of You" was popped with foam squares.

Thank you for stopping by today!


Wednesday, February 16, 2022

CORNER TUCK FOLD CARD


 Lori Pinto showed how to make this card with a YouTube video.  I don't think I had ever made one with this fold.  

She used the new Daffodil stamp from Stampin' Up.  I didn't have that one - shocker!  I substituted the Color and Contour flower.  When I stamped the "Sending Hugs", there was just a tiny spot of black from the rim of the stamp.  I love the challenge of covering up mistakes. Fortunately, the stamp that has these three little hearts worked out perfectly!  

Thank you for coming by today!

Tuesday, February 15, 2022

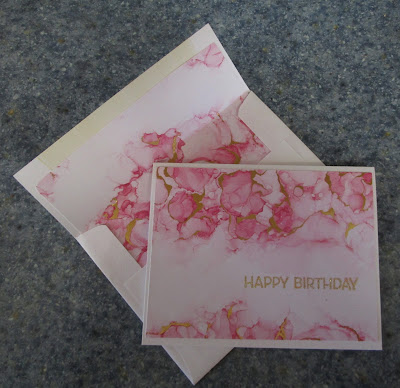
STAMPIN' UP - Expressions in Ink


Very simple.  I added a 5 1/4" x 4" piece of the designer series paper to a white card base and then heat embossed Happy Birthday with gold powder.  Lining the envelope always adds a nice touch.

Thank you for coming by today!


Monday, February 14, 2022

HAPPY VALENTINE'S DAY! - Treat Box


Last Thursday, Wanda Pettijohn posted one of these cute treat boxes along with the video that another crafter had made.  I watched the video on YouTube and decided to give it a try.  I made two mistakes even after watching it.  Things to remember: 

1. Below I am including a picture of the pattern but with one change.  Her pattern cut out a rectangle that you will see in the video. I didn't follow the instructions from the video because it seemed like an extra unnecessary step when she ended up with a heart window anyway.  I cut my heart out and added the acetate on the inside without the extra pieces she added.  (When you see the video, you'll understand what I mean. The person in the video wanted to use the SU heart punch but it won't reach far enough into the box -- I used a die.)  My picture of the pattern shows the direction that the heart should be cut.  The first time mine was upside down when I started to make the folds! One wasted piece of designer paper!

2.  If you are using double sided paper with a direction on one side, be mindful of whether you want that side to show through the window or on the outside of the box.  For the box I am showing you, I had intended to use the other side of the dsp for the outside but after making the folds, the design was upside down so I just reversed the folds.  By doing so, now the pattern on the inside is right side up.  

If you make one of these, which really is easy once you give it a try, this will all make better sense.  Watching the video is helpful though.  Below is a picture of my revision of the pattern the video shows.  The placement of the heart can be a little higher than I have shown but needs to be placed so that the flap closure will not cove it.


Thank you for coming by today!


Friday, February 11, 2022

STAMPIN' UP! - Blackberry Beauty DSP


I saw a card on a new blog that I had visited.   She had made a card similar to this but hers was made into a gift card holder and she had also added a layer of the Be Dazzling paper between the card base and first layer of dsp and then another layer of the Be Dazzling paper between that dsp and the mat for the top layer.  I simplified my card because I want to be careful how I use that dazzling card stock.  I avoided the extra layers and the weight that it gave to the front of the card.  

Thank you for coming by today!


Thursday, February 10, 2022

STAMPIN' UP! - Blackberry Beauty DSP - 2 Cards


I hadn't watched one of the videos from Rachel Tessman for quite awhile but when I was looking for ideas to use the Blackberry Beauty DSP, I found one that I really liked.  

For my card, I chose a different dsp for the two stripes but did use the "cork" paper for the other two like she had.  For Rachel's card she used a label punch of Cinnamon Cider card stock for the sentiment and white for the leaves.  I chose to stamp on a white punched label for the sentiment and gold foil for the die cut leaf branches  I love this paper!  It is so elegant!  

The second card below was made using a different sheet from the paper pack and using the daisy punches instead of the leaf branches.  I like it too.

Thank you for coming by today!

Wednesday, February 9, 2022

STAMPIN' UP! - Painted Petals


This was another card kit I had made up for my friends and I to make using the same stamp set as yesterday's card.  We assembled this very simple card while we were together.  I added the birthday sentiment afterward.  When we get together, most of the time they leave the sentiment off the front of their cards so they can decide later how they would like to finish.

Thank you for coming by today!

Tuesday, February 8, 2022

VERY SIMPLE - Stampin' Up! Painted Petals


 It doesn't get much easier! This is one I had put together as a "kit" for my friends and I to make the last time we were together.  I actually did add the little butterfly to mine and they added their own sentiment to the front of the card.

Thank you for coming by today!

Monday, February 7, 2022

HAPPY BIRTHDAY, TUCKER!


Making a card for a young man turning 16 is not easy!  I really struggled with this one.  I have been trying to make cards that are not the typical A2 size.  I have a Sizzix set of 21 dies for this type of card.  I used the Stampin' Up! Star dies to cut pieces with Shades Spruce, White and Gold foil.  The designer paper is from the Stampin' Up! 6 x 6 Plaid Tidings paper pack.  

After cutting the designer paper with the dies included in the set, I thought it left too wide of a white margin around the plaid and I didn't like that.  I decided to mat the pieces with Shaded Spruce card stock.  I placed the plaid piece on the green card stock and then drew pencil lines around it to get the right size.  

Because I wanted to take a picture of the card, I wish I would have put a white piece on the back side which also has a piece of the matted plaid paper. and used that for the signature. I could have just stamped "Happy Birthday" on the front piece.  I had already messed up things three times so I just decided to leave it as is.

Saturday, February 5, 2022

UPDATE ON 2 JANUARY 18 POSTED CARDS

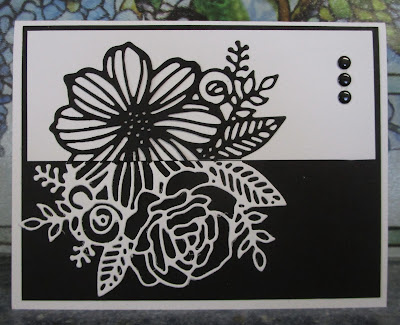
It's been a while since I posted anything on Saturday, but thought I would show how I decided to finish off the cards that were on my January 18 post.  I simply added the three black metal pieces to the first one.


As you can see, I added a "with sympathy" to the second card.  Unfortunately I was needing one at the time and thought this would work.


Hope you are having a great weekend.  Hope you will come back again on Monday to see the card I put together for our grandson.    

Friday, February 4, 2022

STAMPIN' UP! - Simply Marbelous 6 x 6 papers


Stampin' Peace - Mary Knabe showed a fun way to use the Simply Marbelous papers.  I  had gotten them FREE with a $50 order.   She made 2 cards using sheets of all 6 colors and then 2 tags with the little pieces that were left.  I didn't make those.  Below you will see the second card which is much simpler.


 Thank you for coming by today!

Thursday, February 3, 2022

STAMPIN' UP! - Expressions in Ink dsp


I saw a video making a "Double Z fold" card using papers from this package.  The piece on the inside is the same because it gives that nice white area to stamp a sentiment.  I used a different sheet for the strip on the outside.  When opened there is an area to add a white piece to  write a little note and sign.  For this one I decided not to make it a Double Z fold.  I liked it just the way it is.

Thank you for coming by today!


WITH HEARTFELT SYMPATHY


Last Tuesday and Wednesday we had two funerals.  In a small town like ours, we know so many of these people.  One was the Godfather of our youngest daughter.  The other was the father of the young man who took the job working for our town when my husband retired.  This is the card I made for both of them.

I saw one with this idea on Pinterest.  I masked the area for the square.  Using blenders, I applied the Pear Pizzaz and Baja Breeze inks the way it was on the card that I had seen.  I used similar but different stamps for the sprig, birds and sentiment.

Thank you for stopping by today!


Wednesday, February 2, 2022

VERY CLEAN AND SIMPLE


After using this paper from the Expressions in Ink 12 x 12 paper pack to make a card you will see tomorrow, I found this little scrap on my table.  It was just too pretty to toss and the flower was perfectly placed.  I matted it with back and added it to the white card base with black foam squares.  Since it is such a simple little card, I thought it would be a good one for the "just a note" sentiment.

Thank you for coming by today!


Tuesday, February 1, 2022

CLEAN AND SIMPLE VALENTINE


As I mentioned a few days ago, I said I would post a picture of the 150 Valentine cards we made.  Sometimes I cut pieces for 2 or even 3 different ones to make.  Valentines are a little hard for me to come up with ideas that we can do in a relatively short time. My friends and I usually get together to do these and get them done in 3 to 3 1/2 hours.

The stamp is from Penny Black and I have had for a long time and it had never been used.  With a MISTI,  this card was very easy to make.  Before we got together, I cut all of the white bases, red mats and white layer for the heart.  I then went ahead and stamped all 150 designs and "Happy Valentine's Day" inside.  All we had to do was assemble them.  Usually I don't do so much ahead of time, but it had been several months since my friends had been able to do some of the card kits I make up for them.  I wanted some cards for them to be able to take home for their own use.

I started off the session having them make the flower card made from heart punches and then we got down to business.  Since these didn't take long, they had the chance to make several cards just for fun.

Thank you for coming by today!


Using the pattern from  this  video referred to yesterday, you will get just one of this card.  Karen Titus added her squares right to the c...