Monday, April 30, 2018

STAMPIN' UP! - Botanical Garden Designer Paper


When I made the birthday card last week that I sent to my friend, Georgia, the designer paper was still on my table.  I had signed up for our group's April Artist's Choice swap so this is the card I used to send to my partner.  

I cut a piece of the designer paper to 4" x 5 1/4"  and added it to the front of the So Saffron card base.  I got the idea for the So Saffron strip on the front from Pinterst.  I punched the Butterfly with an SU punch and added the sentiment from an SU Sincere Salutations stamp set.  It seemed a little empty at the top so I stamped a lacy border from a retired Hero Arts stamp set.

Since there was a pearl in the center of that little punched flower, I added a piece of stiff card stock over it to protect it from the postal system processing.  

Thanks for coming by today!


Friday, April 27, 2018

DOUBLE DRAPE FOLD


I saw a video on YouTube showing this style of pleated fold.  I grabbed a piece of dp that wasn't one of my favorites but one that I was going to try to actually use.   Before it was added to the front of the card, I wasn't really crazy about it, but once I added the matted flower design, it started to take shape.  I embossed the white mat and adhered it to a Stampin' Up! Pool party card base.  It turns out that I liked it better than I thought I would.

Now check out the card below:


I don't like to waste big pieces of designer paper if possible since they aren't always cheap.  After doing the cutting on the floral dp for the first card, I had 4 triangles left.  If you look really close you can see the scored lines on the dp.  YouTube also showed how to make use of those triangles instead of discarding them.  By placing them around the outside of the white layer, there was a white area that wasn't covered, but the matted floral design worked just right over that area.  

It's Friday, so I hope you have a great weekend!  We're going to be attending a dance recital where two of our granddaughters will be performing.  I love watching them dance!

Thanks for coming by today!  Hope you come back again on Monday!

Thursday, April 26, 2018

REQUEST FOR DRAPE FOLD MEASUREMENTS

I had a request to post the measurements again that I had posted earlier this month.

STAMPIN' UP! - More English Garden dp


The package for the designer paper lists Night of Navy as the color for the blue in this paper.  I thought it was going to be a little too dark for the sentiment so I think I used Pool Party.  I'm wondering if I would have been better of using the Night of Navy.


Thank you for coming by!

Wednesday, April 25, 2018

STAMPIN' UP! - English Garden dp


Vertical Card


Horizontal Card
(I'm not as thrilled with the way this one was finished off.)

Tuesday, April 24, 2018

I CAN'T STOP MAKING THEM


The designer paper for this one is from Stampin' Up! "Floral Boutique".  This is one of my favorite packs that I have purchased from SU.  The dragonfly is also from Stampin' Up!

When I cut the angle for the papers, I accidentally cut it so that the direction of the folds is different.   I could have folded it the way my other cards are, but then the dark side would have been on the back side and there was too much white for my liking.   This works too.  

For the rest of the week I'll be showing you some more of these cards because like the headline for this post says, "I can't stop making them".    Hope you don't get bored seeing them.

Thank you for stopping by today!

Monday, April 23, 2018

STAMPIN' UP! - Rose Garden die


It looks like Winter finally decided to leave us.  Spring is finally showing up today and for the rest of the week!!!!  Now just so it doesn't turn into summer temperatures too soon!

My card today is a very simple one.  I used the die to cut out the beautiful Rose from a piece of ivory card stock that measured 4" x 5 1/4".  I saved the right hand portion of the "waste" and inserted the die cut back into the part that was cut away.  This die makes a very quick card but still beautiful!  

I have been making a lot of cards lately and actually have enough made to share clear through May.  Now all I have to do is remember to post them.  I hope to have one on every day Monday thru Friday each week.  Thanks for coming by today!

TWO NEW DRAPE FOLDS


This is the double pleated fold.


This is the reverse pleated fold.

Thank you for stopping by!

Friday, April 20, 2018

BLACK AND YELLOW


The die was still on the table so I cut out a bright yellow butterfly.  Our oldest granddaughter attends the University of Iowa and I had purchased some "black and yellow" papers to make her a special card using Iowa colors.  The black with yellow dots worked great with this butterfly.  I matted with yellow card stock and then added to the white card base.  The sentiment is from a Stampin' Up! stamp set.

Thank you for coming by!

Thursday, April 19, 2018

BLACK AND WHITE


This butterfly was die cut to use on a different card but I decided I wanted something more delicate.  I pulled out my pad of black and white papers and put this simple card together very quickly.  I like it.

Thanks for coming by!

Wednesday, April 18, 2018

STAMPIN' UP! - Waterfront


This was a set that I was not going to buy until I started seeing some cards made with it.  This is pretty much like one I saw on Pinterest except I added the "blue moon" and used a different stamped sentiment.  The one I saw also had a band across the middle.  I like this set because it can be used for guys.  It looks like there might be a bit of a wind because my trees look like they are tilting a bit.

Thanks for coming by!

Tuesday, April 17, 2018

HOMETOWN GREETINGS from Stampin' Up!


OK......I couldn't resist one more card using the dies.  I had cut several pieces and was going to put them away, but decided to do just one more.

This was the third die with buildings.  I cut an oval window in a white piece of card stock measuring 4" x 5 1/4".  The piece was then embossed with the Softly Falling embossing folder.  Once I cut the piece with the scene, I attached it to the back of the "window".  When added to the Night of Navy card base, I stamped the stars with VersaMark ink and heat embossed with gold powder.

When I make cards using a colored base, I almost always add a white liner for the message inside.  And if there is a small stamp that I can use to decorate the inside, it adds a nice touch, too.

Now I have two Christmas cards ready for 2018!  

Monday, April 16, 2018

STAMPIN' UP! - Hometown Greetings & Hearts Come Home


The day I actually made this card it was snowing outside and it didn't feel like Spring was ever going to show its face.  I had purchased this bundle after Christmas and decided to actually give it a try.  I love the dies from this set. They make a really neat scene on a card.

I used two of the dies to cut the buildings.  After they were added to the Marina Mist card base, I tore a piece of white card stock to add a little more dimension for a snowy hill. (Sorry it doesn't show up the best in the picture.)

The stars and moon were stamped with VersaMark ink and then heat embossed with opaque white powder.  Seeing the card now on my blog, I may add a few more stars. The sentiment was stamped with VersaMark ink and then embossed with silver powder.

There will be more cards in the future using this set.  I have a head start on Christmas cards for 2018!!! Thanks for coming by today!

Friday, April 13, 2018

ONE MORE DRAPE FOLD


I had made a card using this paper a few days ago and still had it on my table.  So why not use it when I had seen a card which was virtually the same.  Instead of ribbon across the top, I used a punched edge, a different sentiment and my leaf is slightly different.  

If you can't tell, I'm really having fun with this type of fold and CASING another card made this one go together very quickly........but it sure does make a statement.

Thanks for coming by today!

Thursday, April 12, 2018

DRAPE FOLD LINK

Yesterday I had someone ask me for the link to instructions for the "Drape Fold" card I had posted...............Drape Fold video  Once you watch this one you will see that there are various videos on You Tube.  If you watch several as I did you will find other ideas.

One suggestion:  Try this first on paper that you don't like to make sure you get the results you want.

Here are three pictures that you can copy and print off if that would help you.  But watch the video.  The video says to use a piece that is 4" x 11 1/2".  I use the full 4" x 12" and then trim off the small piece on the right once it is on the card.....just to be sure it goes all the way across.


I saved the small piece that was left over, folded it like you do for this and it would fit on a card that is 4" wide.  Below you will see measurements especially for a vertical layout.

I am also adding two more pictures of samples that I made up for myself to keep:


I hope this has been helpful.  Let me know if you have any questions or suggestions.


STAMPIN' UP! - Delightful Daisy Designer Paper


When I saw this piece in the package of designer papers I was a little skeptical about using such a big pattern.  I found some other cards that I CASED and this was a small piece left over from others i made.  I wasn't about to let it go to waste.  The striped dp is also from a scrap that was left over.  I added just a small piece of the solid Olive Green under the flowers to the right of the card.

The other cards I made are not finished yet.  A friend of mine is going to let me use her coordinating stamp set and punch to make the final pieces for those cards, but they won't get completed until our gathering in June.  I'm taking a Stampin' Up! stamp and die set that she didn't purchase for her to use. It's so great that we can share our "toys" when we get together.  Hope you'll keep coming back to see the finished cards.

Thank you for coming by today!


Wednesday, April 11, 2018

DRAPERY FOLD CARD


Recently I saw a card on Pinterest using this fold.  It was so pretty!  I found several YouTube videos and each seemed to use different measurements so I pulled out some papers that I wasn't really fond of to experiment.  It took several tries before I got it right.  Some of the ones I tried didn't go from edge to edge even though I had used the measurements furnished.

Once I found one that worked really well, I needed to find just the right double-sided designer paper in my "stash".  The measurements I chose use a piece which is 11 1/2" x 4" which gives you enough to make 3 cards from one sheet.  However, I found that I was 1/2" short of reach completely across the card so I left it 12" x 4" and it came out just right.

To cover the top edge you could add a pretty ribbon but I chose to use a punched scallop.  The dragonfly is a Stampin' Up! die cut.  I didn't want to add the sentiment in black with such a soft color on the dp.  It looked very close to SU Baja Breeze....which turned out to be a little brighter but still worked.

If you want a link to the directions I used for this fold, just let me know.  Thank you for coming by!

Tuesday, April 10, 2018

MORE STAMPIN' UP!


This is another pattern of the paper in the Stampin' Up! Floral Boutique designer paper.  Full disclosure:  The card is a CASE of one on Pinterest.    The beautiful die cut is from the SU "So Detailed" thinlits die set.  Placing it against the Night of Navy card stock really sets it off.  I did use a different sentiment.  The "Wishing You" comes from the Verve stamp set  There are nine coordinating stamps that go with it to use inside the card.  I think this will make a really pretty anniversary card for someone.

Thank you for coming by today!

Monday, April 9, 2018

STAMPIN' UP! - Floral Phrases


I can't take a bit of credit for this card.  Ok, yes, I made it but it really is an exact CASE of a card I saw on Pinterest.  The minor change I made was using a different sentiment.

I cut away an edge of the front of the card and added a piece of designer paper the same width along the inside edge of the card. The dp is from the Floral Boutique series.  It's a really beautiful collection!

Check out the picture below.  I lined the envelope with some of the dp from the same series.


Thank you for stopping by today!

Friday, April 6, 2018

HAPPY BIRTHDAY, GEORGIA!


I think I mentioned on an earlier post that I am trying to make myself use some of the beautiful designer papers that I have here.  I buy them thinking they are so pretty and then find it hard to cut them up.  Well, it's time!

My friend, Georgia, will hopefully be celebrating her birthday tomorrow.  This is the card I made for her.  The colors look a little washed out in this picture, but are much more accurate in the picture below.  

I sent the card early and I know she has received it so it's safe to show it to you today.  The designer paper is from the Stampin' Up! Botanical Garden series. The card stock is So Saffron and Black.  I lined the inside of the card and placed a small stamped image inside along with a sentiment.


This picture shows the card inside the envelope which I lined with So Saffron designer paper.  I love lining envelopes for special cards but don't think to do it often enough. 

Thanks for coming by today! 

Thursday, April 5, 2018

STAMPIN' UP! - Birthday Blooms


When I was seeing some cards on Pinterest using paper from the Birthday Bouquet designer series, I saw these stamps being used with some of it so I pulled out the stamp set.   I've had this set for a while and not sure any of the stamps from the set had been used.  I used Copic E42 to color the flower petals and YG63 to color the leaves.  The green is a little darker than I had planned but is OK.  

The mat is Stampin' Up! Crumb Cake card stock and goes so well with the color of the flower.  

I have really been having fun working on cards again and actually have enough cards made to post through next week!  I'll keep working.......no playing.......and getting some more planned for the following weeks.

By the way, I tend to make way more cards than I can use and right now don't have a lot of outlets for them.  I happened to learn that a Veteran's Home loves to receive cards for the residents to use.  I gave the local Ladies Auxiliary a bunch to take to the home for them to use as they are needed.  If any of you have extra cards, there are usually places that are very happy to receive donated cards.........and handmade cards are certainly a special gift.

Thank you for stopping by today!

Wednesday, April 4, 2018

ANOTHER CASE USING STAMPIN' UP! DP


The very pretty floral paper was used in the card I saw but the contrasting paper they used was the cute little tulip design that you saw on the Easter boxes I posted last week.  They had also placed the larger piece of floral paper was on the bottom.  Naturally I wanted to make this my own so I flipped the design and used a different contrast.  The dotted paper appearsNew post to be almost black on the picture but it is actually from the designer pack and is Olive Green with the white dots.  

For the sentiment from Inkadinkado I punched a piece of white card stock on both edges which allowed a nice space for "On Your Special Day".

Thank you for coming by today!

Tuesday, April 3, 2018

MORE STAMPIN' UP! Designer Paper


This is another CASE of a card I saw on Pinterest.  I used different papers and a different sentiment.  The flower looked a little plain so I ran it through the Cuttlebug with an embossing folder.

Thank you for coming by today!

Monday, April 2, 2018

BEAUTIFUL STAMPIN' UP! DP


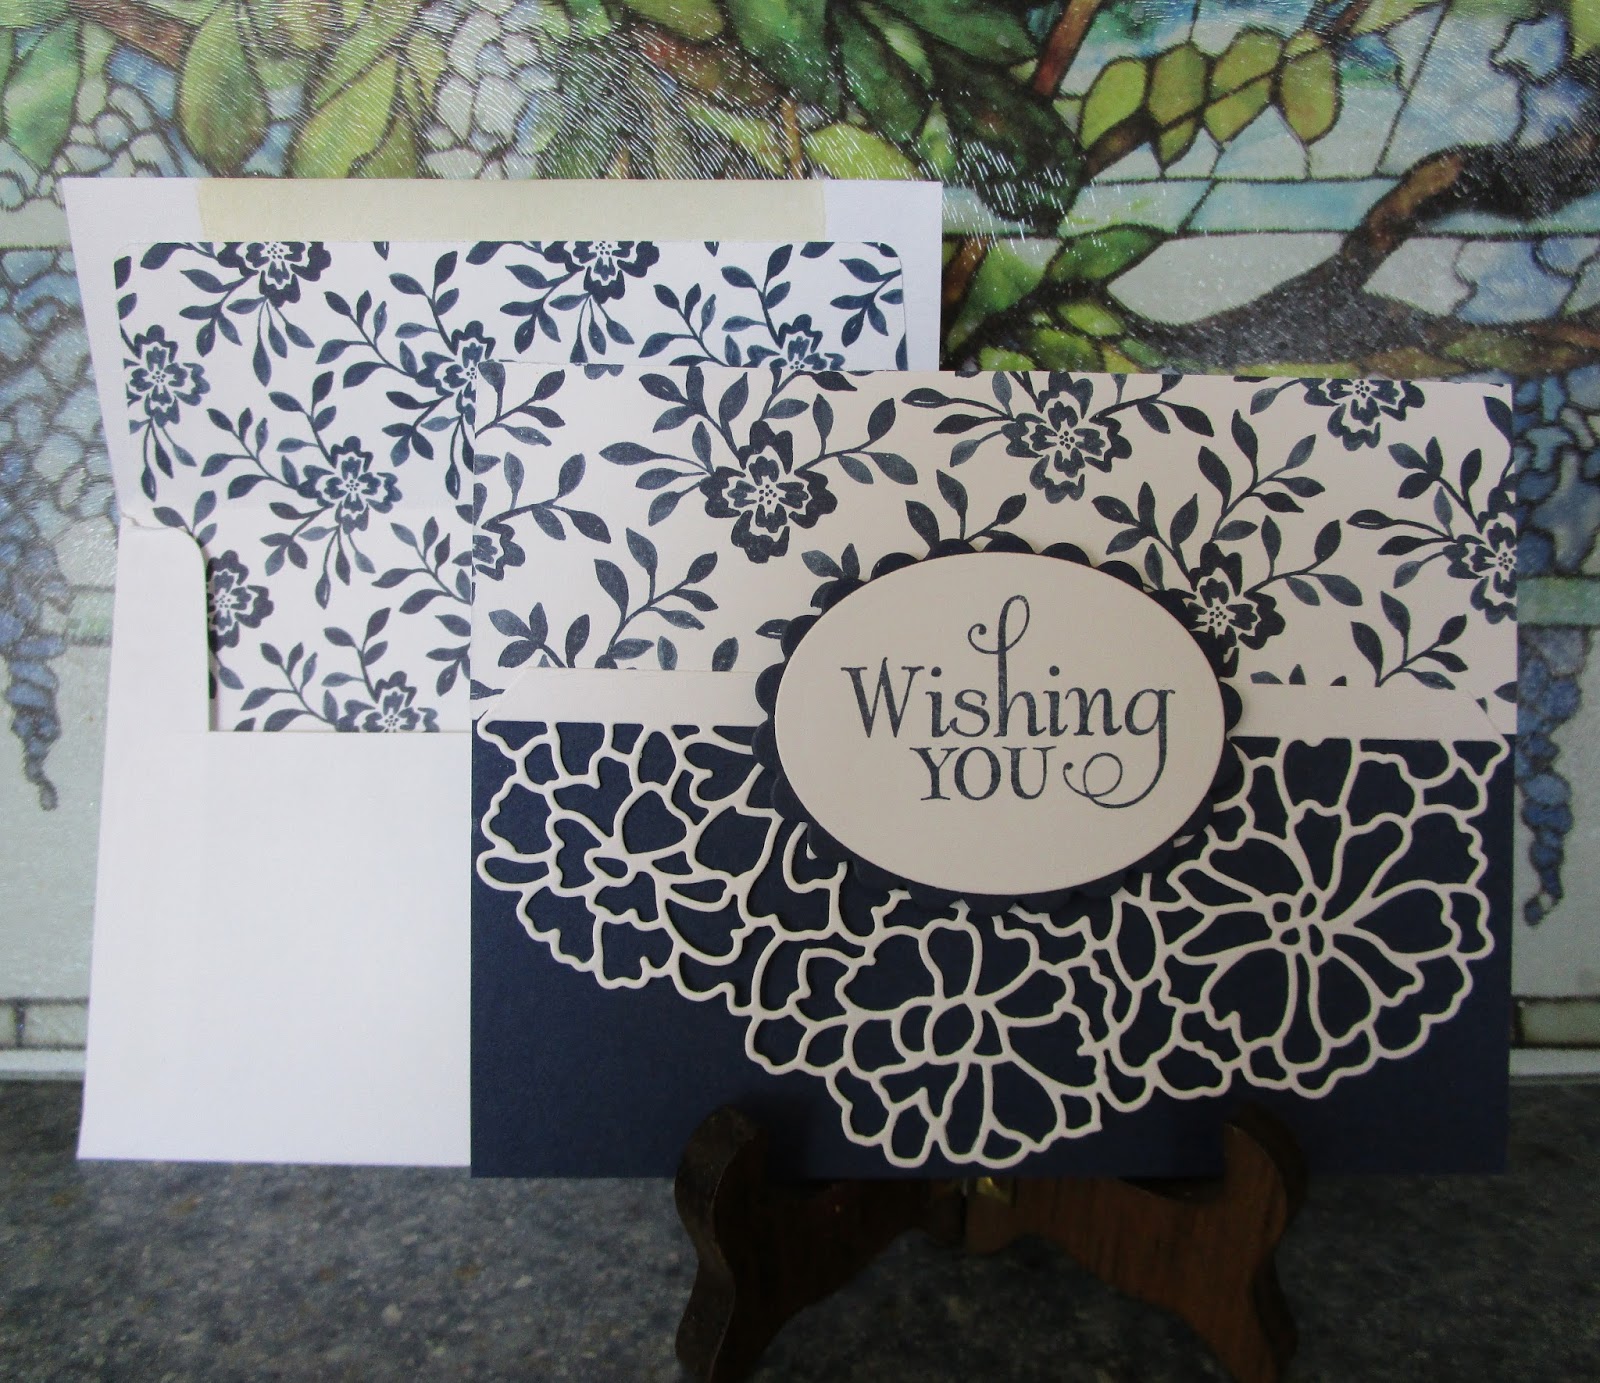
I saw a card on Pinterest using this layout.  I chose different papers which made my card a different color than the one I saw.  The sentiment I used is from Stampin' Up! as well but different than the card I CASED.  

My "stash" of designer papers needs to be used.  Although I won't be able to use up what I have in my lifetime, you will be seeing more cards this week using some of them.

Last Wednesday we picked up two of our grandchildren who were on Spring Break.  We love having Tucker and Taryn come and usually have some fun things to do.  Making a double batch of cut-out Easter sugar cookies was high on the agenda as well as making a double batch of chocolate chip cookies for Grandpa.  I still have a box full of Easter candy molds from "back in the day" when I was selling Easter suckers and boxed pieces of all kinds.  I had intended to sell them this year but forgot so I brought one of them out with some candy melts for them to make some little chocolate bunnies.  Needless to say Taryn latched on to several of the molds and took them home to play with there.

The kids went home on Saturday but we went to their home yesterday for a grand Easter Dinner.  Their father was a chef at one of the popoular restaurants in the Amana Colonies when he was going to college.  He is now a pharamacist but could sure open his own restaurant the way he cooks!

Thanks for coming by today!

Thank you for coming by today!

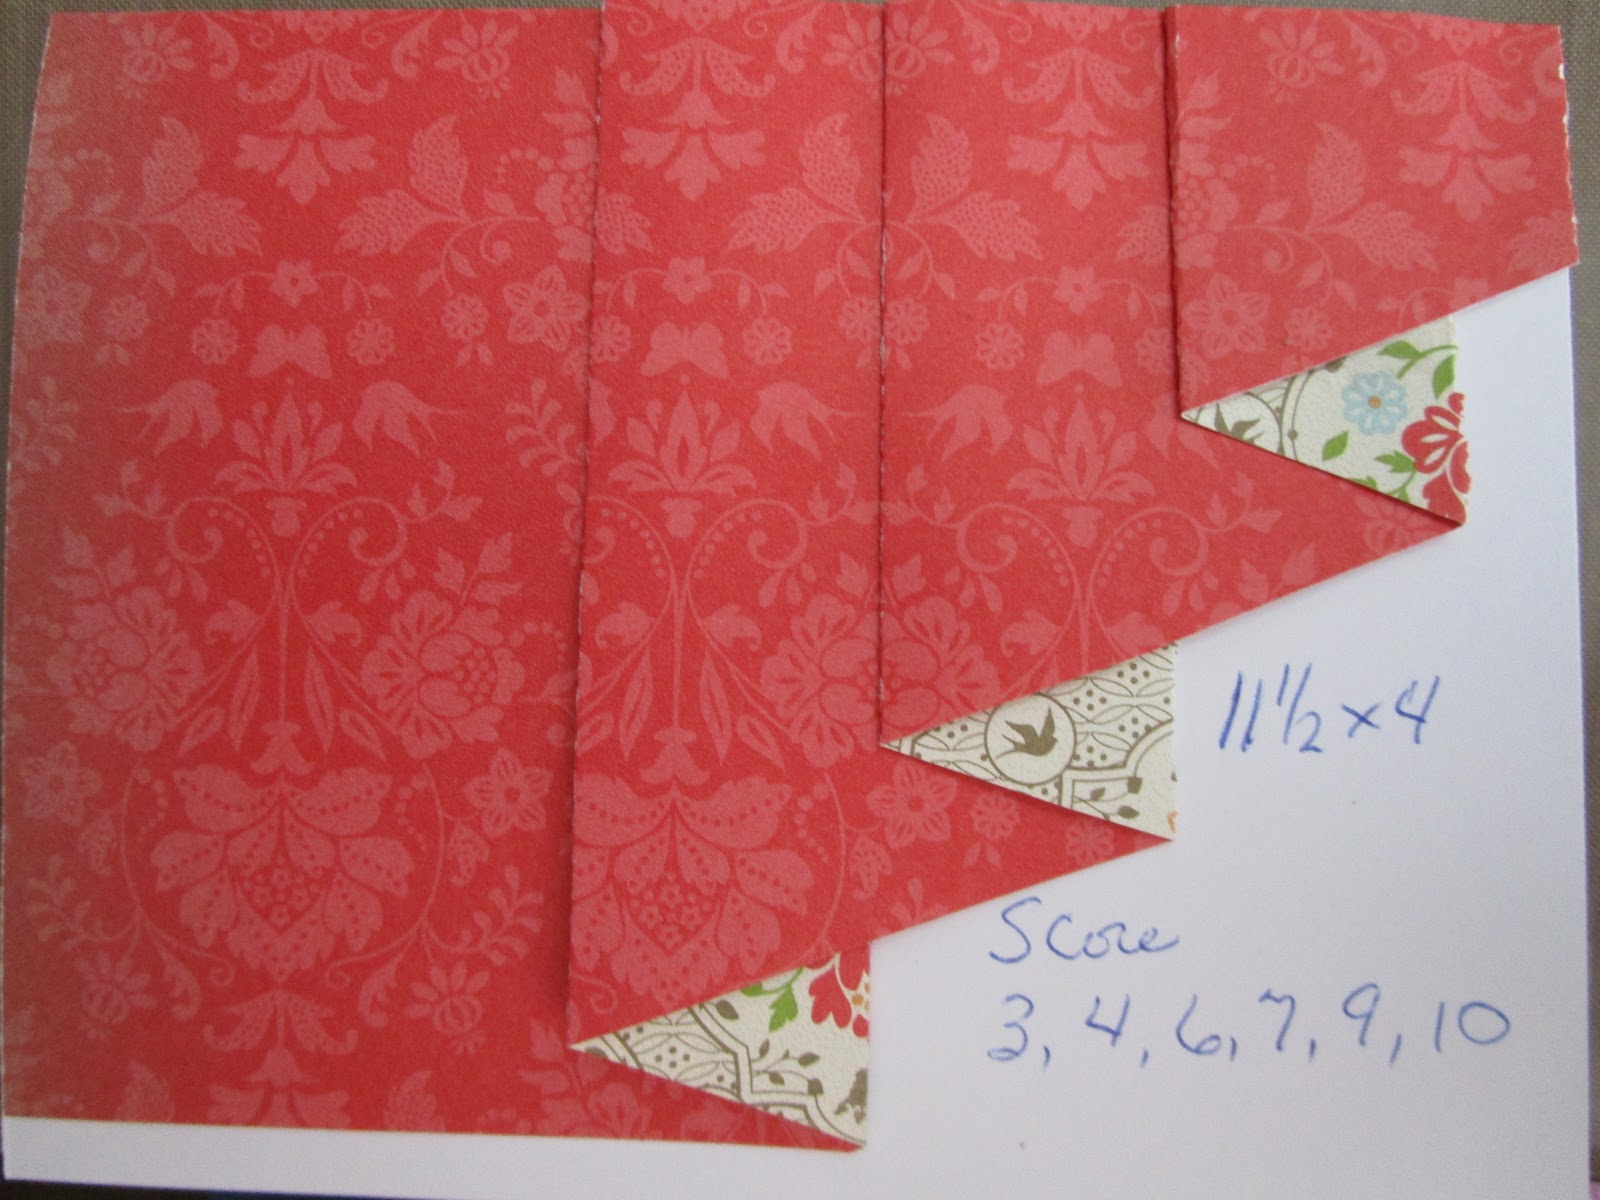
UPDATE:  To answer a question about the flowers in the middle section of this card.  I fussy cut them from the designer paper. The designer paper I used was from the SU "Painted Blooms" designer paper. I used two sizes of Spellbinders square dies for the layered squares. The card base is 8 1/2" x 5 1/2". The white layer is 5 1/4" x 4". The colored card stock is Pacific Point from SU.

From the pattern on  this  video you will get two cards with this layout.  These are mine. Thank you for coming by today!