Wednesday, February 29, 2012

LAST FEBRUARY POST

The last few days have been pretty busy.  Sunday we had our 4-year-old granddaughter come stay with us.  She was going to stay two nights but announced Monday afternoon that she wanted to go home.  I guess reading books, doing puzzles and playing with Barbies had run the course of fun.  :)  She has stayed with us for longer periods of time but was taking medicine for a cold and it seemed to be upsetting her system.  We did have fun while she was here.

Yesterday was spent catching up on some orders but today I had time to make this card for my brother's birthday.  I'm not quite satisfied with the brayering I did, but I do like the black design which I stamped on it.  

Thank you for stopping by! 

Saturday, February 25, 2012

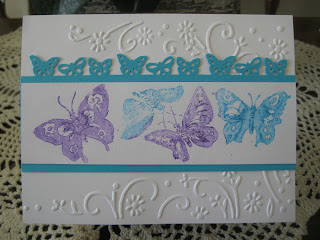
BUTTERFLIES STAMPED WITH GELATO

I was having fun playing with the Gelatos I had just purchased so I tried it again by applying it right to this Penny Black stamp and then misting it with water.  I had more luck getting a good image when I used the craft pad under the card stock.

I had a scrap of SU Tempting Turquoise card stock that was about the size I wanted so I punched the top edge of it with the Martha Stewart butterfly border.  The image was trimmed and added to the turquoise layer.    Once again I wanted to find just the right embossing folder and liked the way the Crafts-Too "Daisy Flourish" looked with the image.

Interesting note:  I had recently found a good deal on some Darice embossing folders so I ordered 5 of them that were "different" than ones I had.  Well, guess what!  The Darice "Floral Border" is exactly the same as the Crafts-Too "Daisy Flourish"!!!  So now I have two of the same thing.  That isn't bad enough another one I ordered is also a duplicate with a different name.  I had no idea that two companies would make the same folder but call it something different.

If anyone is interested in either of these duplicate folders that I bought, just let me know.  They would be $4.00 each plus a little to send them.  It is difficult to take a picture of embossing folders but the one is called Darice "Floral Border" and the other is called Darice "Star Border".

Friday, February 24, 2012

FABER-CASTELL GELATOS

I saw a Penny Black video recently using Faber Castell Gelatos.  Now I had never even heard of "Gelatos" other than that "Gelato" is a wonderful cold treat in Italy.  :)  These Gelato colors are in a tube much like chapstick and are really fun.  You can apply them to the card stock and then blend them with your finger.....or you can apply them right to the rubber of your stamp and mist them with water to give a watercolor affect.  Have any of you tried them?

First I tried smearing there colors on a smooth surface of regular card stock.  Blending them on that type of card stock didn't work so well so I tried again on glossy paper.  That worked much better.  After blending the colors I added a little more of the lavender shade to give it more color.  OK.....now what do I do with this piece?  I put it aside. 

Next I applied some of the lavender and green colors to a Penny Black rubber stamp and misted it with water.  It took several tries but I finally got a couple of images that I really liked.  Using one of the Spellbinders Labels Eleven I cut and embossed the flower image and then with the next larger die I cut and embossed a piece from the glossy paper. It made a nice layer for the flowers.

For the front of the card I had a hard time deciding on which embossing folder to use so I embossed several card fronts and used the one which had been embossed with the Craft Concepts "Budding Vine" folder.  The ones I didn't use will eventually be used. 

I felt it still needed a further embellishment and as luck would have it I found the perfect color on a card of fibers from Darice.

Thank you for stopping by!  Your comments are always welcome.............I love hearing from you!

Thursday, February 23, 2012

HAPPY BIRTHDAY TO MY MIL

HAPPY BIRTHDAY to my Mother-in-Law who is 92 years young today!

Yesterday's card used this same rose stamp and today you can see nearly the entire design which I stamped in the corner of this pink gingham designer paper. I don't think I have ever stamped on designer paper before unless I was doing paper piecing, but this time it really worked out well.  

The bird cage stamp which coordinates with the rose stamp was also purchased in Branson MO and had never been used.  I got the idea for this card from one I saw in their store.  I did change it up a bit for my use.  Copic markers were used to color the designs.  The pink butterfly was from a package which had not been opened that I have had for quite a while and it seemed like the perfect finishing touch to the card.

Thank you for stopping by!  I invite you to leave a comment to let me know what you think.

Wednesday, February 22, 2012

TWO NEW ITEMS USED

Last summer on a trip to Branson, MO, I purchased the stamp for the lacy oval  as well as the stamp that has the rose design..........after all this time they had sat on my shelf but Monday I was determined to use some items that had been purchased but  never used.

I stamped the lacy doily with VersaMark on SU Pretty in Pink card stock and then embossed it with white embossing powder.  The rose design is actually larger than that and will be on a card tomorrow.  It was stamped with Memento Tuxedo Black ink and then colored with Copic Markers. Fortunately one of the Spellbinders Classic Ovals was perfect to make the rose design fit inside the lace design.  But I had to cut the lace design out using my craft scissors.  

The rose embossed background was made using a Cuttlebug folder on the front of a card -- and I'm not sure that I ever used it before either so maybe I actually used THREE new items that had been in my collection.  After just laying the lace oval on the front, I decided it looked too plain so I cut the embossed background from the front of the card and cut it down slightly.  Then I ran the edge of the pink Copic marker around the edge to give the illusion of another layer.  

Glitter was added to parts of the stamped roses, but I don't believe that shows up in the picture.

Thank you for stopping by!  Your comments are always welcome...............I love hearing from you!

Tuesday, February 21, 2012

VERTICAL STAMP

Another card part used!!!  Way more than a year ago, I made up several of these designs stamping a flower and then adding the vertical sentiment stamp over it.  The "Celebrate" stamp is from Paper Inspirations.  I still have a couple more in my card parts basket.  The green piece was a scrap that I didn't even have to cut down but I embossed it using the edge of Crafts Too "Daisy Flourish" folder.  

Thank you for stopping by!  I hope you will come back tomorrow and Thursday to see two more of the cards I made yesterday using items I had purchased last July but never used.

Monday, February 20, 2012

SPRING DAFFODILS

After a very busy weekend, I was ready to dig into my craft table and make cards today.  Sometimes I sit at the table and just look at the "stuff" I have and the mess on the table......and totally uninspired.  Well, this morning I was able to make four cards before Noon.  That felt really good.  This is one of those cards and the others will be posted over the next few days.

This stamped image was made and mounted on the colored SU card stock pieces at least a year ago.  I wasn't satisfied with the card I had it on, so I had removed it and it was in my card parts basket.  To continue my goal of using up some of these pieces, I took the easy way out of mounting it on a cream colored card front which had been embossed with the SU tulip border.  The stamp is from Penny Black.   I believe the stamp waas colored with SU markers.

Thank you for stopping by!  Your comments are always welcome............I love hearing from you.

Friday, February 17, 2012

CASE OF MY OWN CARD

Today I used the same layout but used a dp from a Basic Grey "Origins" paper pad for the background, the flowered strip and the butterfly.  If you look closely you can see I punched two butterflies and "fluffed" the wings on the top layer to give the butterfly dimension.  A very simple layout to use but I know I will use it a lot when I'm in a hurry for a card.

Thank you for stopping by! 

Thursday, February 16, 2012

BLACK AND WHITE

I do love black and white cards and................butterflies!  I saw a similar black and white card using a sentiment from a Gina K stamp set.  I have a pad of black and white card stock designs and the Gina K Whimsical Wishes stamp set so I decided to use those supplies.

I added three small flat black embellishments in the corner but needed one more thing..........a butterfly!  I hate to admit that this butterfly was in a package that I believe I bought in June of 2010 (maybe even June of 2009) when the ladies from my Yahoo group got together.  I had to have them, but found I was "hoarding" them.  The little clear gems don't show up on the butterfly very well in my picture but they were already a part  of the piece.

Come back tomorrow and see how I cased my own card giving it a different look.

Wednesday, February 15, 2012

GLITTERED DAISIES

Another card part used!!! On Sunday the glittered Dragonfly design was done on sticky paper.  Today's glittered design was done using Dreamweaver embossing paste on card stock.  The design gets embossed with the paste and then colored glitters are carefully added to the various parts of the design.  I mounted the card part onto SU YoYo Yellow and Garden Green card stock before attaching it to the front of the Dotted Swiss layer on the card front.

Thank you for stopping by!  I hope you will take a moment to leave a comment.........I love hearing from you!

Saturday, February 11, 2012

VALENTINE - DAY #3

This is one of the 8 cards I made for my MIL to send her great grandchildren.  I used various stickers on the white circles.

Over the next few days I am going to very busy so I am going to schedule cards to be posted without any details.  Please know you can always contact me if you have any questions.

Thank you for stopping by!

Thursday, February 9, 2012

VALENTINE - DAY #2

Little boys probably don't want to get a Valentine that is all frilly and girly.  Our grandson's favorite color is green so I decided that I would try to use GREEN a the main color for his card.  I think John Deere green is his absolutely favorite......but I just didn't see that happening for a Valentine.

I ran the front of the card base through the Cuttlebug with a CB embossing folder and added the dp with the tiny green hearts.  The little boy image is one that someone gave me and I don't remember when it came from.  I was able to use Copic markers to color the image.  I then cut it out and mounted it onto the plaid dp.  The two designer papers were from a paper stack that my sister gave me.

I showed the card to my husband and asked if it was "boyish" enough.  He told me he probably wouldn't look at it all that much anyway.......he'd be more interested to see if there was money inside.

Thank you for coming by!  I hope you take time to leave a comment...........I always love hearing from you.

Wednesday, February 8, 2012

TIME FOR VALENTINES

I guess it was time for me to think about Valentines for the grandchildren........that means 6 cards.  And my Mother-In-Law ordered 8 cards.  I'd better get busy!!!!!

This card was made using a Penny Black stamp (4118H "Mimi's Heart").  I stamped it with Memento Tuxedo Black ink and then colored it with my Copic markers.  I love how you can color with them and leave no streaks. 

All of the papers are from a KaiserCraft 6" "Shaken Not Stirred Collection" Paper Pad.  The image was mounted on a black card stock from that pad.  The oval on the right is actually a die cut from the pad and I added the "Happy Valentine's Day".  (I could have done a better job centering it.).  The scallop at the top of the card is another die cut from the paper pad.  This card will be for one of our granddaughters.

Thank you for stopping by!  I hope you will take a moment to leave a comment.........I love hearing from you.

Tuesday, February 7, 2012

HAPPY BIRTHDAY, TUCKER!!!!


Each of the grandchildren have been sent cute cards made with the Inky Antics HoneyPop/HoneyComb sets.  They are just so much fun for the children to open and see what pops out.  The papers on the front of the card are from the KaiserCraft "Utopia" 6 x 6 paper pad.  I colored the images with Copic markers.

There is a fun variety of these Inky Antic sets.  Let me now if you would like to order any of them.  I can get the stamps sets as well as the HoneyComb pads.

Thank you for stopping by!  I hope you will take a moment to leave a comment........I love hearing from you!

Monday, February 6, 2012

BIRTHDAY CARD FOR TUCKER

Tomorrow is our Grandson's birthday.  Tucker will be 6 years old..........where has time gone!?!?  My mother-in-law likes me to make cards for her great-grandchildren........this is the one she will be sending him.

The main image is a Penny Black stamp.  I fell in love with the cute little PB characters soon after I started selling Penny Black items.  I ordered this one a while back but hadn't used it yet.  I just love how cute it is.  I colored the figures with my Copic markers. Copic Sketch and CIAO markers can get into the tiniest areas.   After coloring the image, I lightly sponged SU Tempting Turquoise ink to soften the look.  It would have looked good mounted onto Tempting Turquoise card stock, but I thought the bright SU YoYo Yellow card stock would probably be a little better for a little boy.

Tomorrow I'll post the card that we are sending Tucker.

Thank you for stopping by!  I hope you will take a moment to leave a comment......I love hearing from you!

Sunday, February 5, 2012

ANOTHER CARD PART USED

When I organized my table (again) a few days ago, I found this glittered dragonfly design.  It was made using a Dreamweaver stencil and a process I learned at a CHA show a few years ago. Since I hadn't made it recently I don't know why I chose the colors that I did.  Now the challenge was to find some dp that would coordinate with those colors.  I was fortunate to find this dp very quickly in a Kaisercraft "Utopia" 6 x 6 pad.  It had the perfect color combinations and this particular piece with the flowers seemed to be a good one to go with the dragonfly.  One more card part used............many more to go.

Thank you for stopping by!  I hope you will take a moment to leave a comment.....I love hearing from you.

Saturday, February 4, 2012

MY VERY FIRST STEP CARD

Some of my friends have made these cards, but I kept thinking I'd give it a try sometime.  Trying something new gets put on the "back burner" most of the time.  I stick with the "tried and true" things that are in my comfort zone.  This month's challenge for those who wanted to take part in the swap was to make a step card so I took a deep breath and decided to finally give it a try.

I admit that it was a challenge for me because it sure took me most of the afternoon to get it done but I am very glad I did it.  A lot of time was spent on deciding the elements I wanted to include on it and I'm not used to doing a lot of measuring to make things fit.

The Martha Stewart grass and fence punches were used to create the front border. That was the easy part.  Since I had used the SU Wild Wasabi and another darker green card stock for the grass, I cut a piece slightly smaller than the two side pieces and the center square.  I wanted a textured background so the next layer added to each area is white card stock that had been through a Cuttlebug folder.

I used SU Pretty in Pink card stock for the Heart Circle and flourishes.  Using a flower design seemed like a logical decision for the stamped design so I stamped the design on white card stock and then cut it out using a Spellbinders Classic Circle which was just the right size to fit inside the Heart Circle. 

I'm pretty pleased with the results of my first try although I think I would make the next one with a little more color. If I make another of these I hope to be able to make one a little more quickly because I think they are fun cards to send (and receive).  

Thank you for stopping by!  I hope you will take a moment to leave a comment..........I love hearing from you.

Friday, February 3, 2012

STAMPIN' UP EMBOSSING FOLDER

Very recently I saw a card like this on "The Paper Players " January 28 post.  The card was made by  Diane Vander Galien and I loved it!  

I have had the embossing folder for quite awhile and never came up with anything that I was happy with.  When I saw her card I knew I had to case it.  I chose different colors, different punched border and a different ribbon to use for the bow.............but basically the card followed her layout.  The SU papers I used were YoYo Yellow and Wild Wasabi.   

I did make a second card using the same colors as Diane but placed the designs on the opposite sides of the card.  I also made one using SU Lavender Lace card stock but not happy with that color with the green.  I even added some yellow to the center of the flowers to give a focal point but it still doesn't strike me as a "winner".

Using my fingers I cupped the flower to give some dimension to the design and added the ribbon bow.

Thank you for stopping by!  I hope you will take time to leave a comment.....I always love hearing from you!

Thursday, February 2, 2012

FEBRUARY CALENDAR

Yesterday I did manage to get my February calendar made to use right away.  (I wasn't feeling the best yesterday so I didn't even get dressed all day.  Shhhhh.....Don't tell anyone.  I spent almost all day at my craft table on the computer and trying to work on cards.)

My  friend, Lynette, has her own blog My Stamping Addiction.  If you visit her blog you can find the files for the 2012 and 2013 calendars to make and decorate your own. Thank you Lynette for making those files available for us.  :)

My February one was very easy to do.  I used stickers from a Penny Black sheet.  I did actually do a January calendar but hesitated to post it since it really was almost an exact copy of what Lynette did on hers.  I was running late with it and wanted an immediate "fix".  :)  So thank you again, Lynette, for the idea.

Thank you for stopping by!  I hope you will take time to leave a comment........I love hearing from all you!

Wednesday, February 1, 2012

SPRINGTIME TULIPS

It's only February 1st but with the weather we had here the last couple of day I've been wondering if we wouldn't see flowers blooming soon.........well, not really but it sure did make me feel like doing something that felt like Spring.

I had a circle already cut using the Spellbinders Heart Circles die.  When I found it on the table I decided to use it and chose this cute little stamp from an SU "A Flower for All Season" stamp set.  I stamped the design and colored with my Copic markers. (If I had chosen the stamp first, I would have stamped and then cut the circle since my design didn't end up quite center......even though I used the Stamp-A-Ma-Jig.)  Parts of the design are quite tiny to color but I managed pretty well by using a very fine touch with the brush nib. 

After coloring the design I put the piece back in the die and swirled SU Lavender Lace ink over and around the stamped and colored image.  Another SU Lavender Lace piece was cut using the Spellbinders Classic Circle which fit perfectly behind the heart circle.  The final step was to attach it to the front of the card base which had been embossed using the Cuttlebug folder which has tiny birds on it that are very much like the bird in the stamped image.

Thank you for stopping by!  Hope you will take time to leave me a note......I love hearing from you!

Two more cards using the "All About Autumn" retired dsp. Thank you for coming by today!