Monday, December 31, 2012

SU "REASON TO SMILE"

 
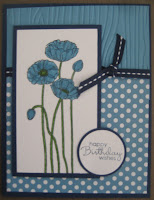
Today, I just cased myself on a card that we made at the SU workshop.  You can see the original card at the bottom of  a post two days ago.  I simply used a different color combination.
 
If you are going to be out celebrating the end of 2012 and the beginning of 2013, please be safe and drive carefully. 

Sunday, December 30, 2012

ANOTHER SIMPLIFIED VERSION


I got the basic idea for card from another one which was made at a workshop.  The background is what I really liked by stamping random flower designs around the white layer.   The flower is from the SU "Reason to Smile" set.  The rest of the card is pretty eay to figure out.  Here is the original card that gave me the idea:


Thanks for stopping by!

Saturday, December 29, 2012

SIMPLIFIED VERSION


A few weeks ago I posted a card made at an SU workshop using this basic design and the same colors.  I didn't have any of the Night of Navy ribbon which I used on that card so I just punched the edge of a piece of Night of Navy card stock and then trimmed down the width to make a nice border across the seam of the two papers.  I didn't add the little circle with the sentiment on it.  The card front may stay this way or depending on what occasion I need it for, I may add a small sentiment for a birthday or get well.
Here is a second card I made now using a different color combination and using a satin ribbon  which I had in my supplies.  At the bottom of the post you can see a picture of the card made at the workshop.
 
The stamp is SU Pleasant Poppies.
 

The demonstrator at the workshop had cut the one piece stamp apart into two designs. I liked the idea so cut mine apart as well. (Just be careful if you decide to do the same to yours. I almost cut into the design on the rubber side because I was using the sticker side of the stamp to use as a guide it it wasn't lined up perfectly. Close call but it is fine.)   Thank you for stopping by!

Friday, December 28, 2012

DIMENSIONAL BIRD

 
When our group of ladies met in Des Moines in 2010, Harriet (Alley Cat Cards) gave each of us a choice of several very beautiful designs.  Each design consisted of three layers and since I really enjoy birds, this is the one I chose.  I'm really embarrassed and a little ashamed that it took me this long to use the pieces.  It  is part of my small attempt to get into things that I have had and not used.
 
 I did have a little difficult deciding how to use this on the card after I had it put together but am happy with what I put together although it is a very simple card.  The card front was embossed with a cherry blossom type design.
 
Here you can see a close up side view of the layers.  Each layer was just a little smaller than the one before.  And I don't think the pictures show it, but the designs all had kind of a metallic shine to them.
 
I wish I knew what company made these because there were a lot of beautiful flower designs as well. 
 
I love hearing from you about the cards I post. Thank you for stopping by!

Thursday, December 27, 2012

REMAKE OF MY FIRST ATTEMPT

 
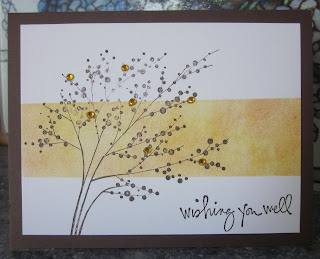
A few weeks ago I made several cards using this technique of sponging a masked border.  The original card was just the white card base with the designs.  I almost posted it then but was really not happy with it.  For one thing I was really disappointed that the branch design didn't stamp out darker.  I must not have inked it up quite good enough.
 
I decided to add a few gold gems to the stamped branch design which helped and then I cut the card front off, trimmed it down and added it to a SU Chocolate Chip card base.  I am much happier with it now so you get to see the remake.
 
Thanks for stopping by!  Your comments mean a lot to me so tell me what you think.

Wednesday, December 26, 2012

TIM HOLTZ ALTERATIONS - Christmas Cardinal


Recently I ordered several Tim Holtz Alteration dies.  I love the beautiful red Cardinals and we have some that stop at our bird feeders especially now that we have snow on the ground.
 
It may not show but the front of the card base was embossed with the Swiss Dots folder.  The die is all one piece and since I wanted the colors I cut only the branch portion of the design but did include the legs of the bird using white card stock.  Then I cut out the Cardinal body portion using red card stock.
 
Distress ink was used around the edges of the Cardinal.  With a Memento black ink marker I drew in the portion around the beak and then colored the beak with an orange marker.  It actually changed the color of the red card stock.  The eye is hard to distinguish on this one because I should have left a tiny round circle.
 
I sponged SU Chocolate Chip ink over the branch and SU Garden Green ink on the evergreen portion.  A Chocolate Chip marker was used to darken the legs of the bird.
 
This die retails for $20.00 but I sell it for $16.00 if you would like to order a new one.  Just send me a message at my email address which is shown on this page.
 
I hope all of you had a wonderful Christmas with your family and friends.  If you are like me, I am looking forward to some "down time" to relax and get back to doing some other fun things.  As for myself, I have pulled out some yarn and have started a baby blanket for a niece who is due with a little brother for their other son.  I haven't crocheted in a very long time and it feels so good.
 
Thanks for stopping by!  Your comments are always very much appreciated!

Tuesday, December 25, 2012

MERRY CHRISTMAS

 
I make a lot of Christmas/Holiday cards to send but I always remember the true meaning of Christmas by also making cards that tell the true meaning of why we celebrate this day.  I had a stamp from Ann-ticipations with a perfect verse for the inside of the card to go with this beautiful image from Paper Inspirations.
 
"A Little Child
A Shining Star
A Stable Crude
The door ajar.
 
Yet in that place,
So crude, forlorn
The Hope of all
The world was born."
 
 
This is the final Christmas card for this year.  I saw a card very similar to this on someone's blog, I believe.  I had already purchased a paper pad that had similar papers in it and the "Merry Christmas" was already on the dp. 
 
We will be celebrating Christmas Day with our family at one of our daughter's homes.  I hope everyone enjoys a very Blessed Christmas.  It's hard to believe that 2012 will soon come to a close and a new year will begin!
 
Thank you to all who visit my blog.  I love hearing from you through your comments!!!

Monday, December 24, 2012

CHRISTMAS #23 - CHRISTMAS EVE


The paper for this card made it easy to put this card together.  I added a dimensional sticker and the vertical Christmas sentiment.
 
We will be celebrating Christmas Eve with a quiet day and then attending church this evening.

Sunday, December 23, 2012

CHRISTMAS #22

 
A more elaborate card I made using the design from Taylored Expressions.  The materials for this were from a kit I had purchased from TE last year but didn't use.

Saturday, December 22, 2012

CHRISTMAS #21

 
Back to a more simple design..........    The front of the card was embossed with a foler and then the vertical sentiment was added using VersaMark and Egyptian Gold glitter.

Friday, December 21, 2012

CHRISTMAS #20

 
I found this great musical dp in one of my paper pads and it was perfect to use with the treble clef die cut and the sentiment.  That layer was added to a piece of gold shimmer paper and then added to the card base.

Thursday, December 20, 2012

CHRISTMAS #19


The stamp is from Taylored Expressions and was colored with Copic markers.  Glitter was added to the tips of the wings and I used a gold gel pen to color the halo.

Wednesday, December 19, 2012

CHRISTMAS #18

 
The trees were stamped with SU Craft White ink onto a glossy cardstock which had been colored with alcohol inks.  Fortunately the inks were just the right color to be mounted onto a card made with SU Tempting Turquoise card stock.  But first I cut a piece of white card stock and punched the lower edge with a snowflake design and then used the punched pieces to decorate the top of the card.  Stickles glitter glue was added to the center of all the snowflakes.


Tuesday, December 18, 2012

CHRISTMAS #17

 
I made a card using this same layout at an SU Workshop.  I liked it and decided to make a second card for Christmas but instead used a sprig of holly design which was stamped with VersaMark and then embossed with white embossing powder.

Monday, December 17, 2012

CHRISTMAS #16

 
The stamp is from Northwoods Rubber Stamps.  I colored the design with  Copic markers.  I attempted to do some shading on the Poinsettias.  I chose colors that would not be the typical red flowers and then added clear glitter to the petals and gold glitter to the centers.

Sunday, December 16, 2012

CHRISTMAS #15

 
This design is one I stamped off from a friend when we gathered in Des Moines.  I colored it with my Copic markers.


Saturday, December 15, 2012

CHRISTMAS #14

 
Cards made using designer paper and dimensional stickers from K & Company


Friday, December 14, 2012

CHRISTMAS #13


Today's card is the only one I made using a brass stencil to dry emboss the pieces.  The "doily" was made by using a Spellbinders die and then cutting the circle in half.
 
I cannot take credit for the design on this since I truly cased the entire design from a card that one of the Lasting Impressions designers (Donna) made several years ago.  I use my brass stencils so rarely now that I decided I was going to make at least one design this year.  Before sending the two cards with this design on it, I did add a little oval shape with Merry Christmas on it in the upper right areas of the card.

Thursday, December 13, 2012

CHRISTMAS #12

 
I made this card at an SU Workshop.  Note the little snowflake by the "Merry Christmas".  I managed to get a smudge there and covered it with a snowflake that I punched and then ran through the Xyron so the glitter could be added to the sticky side.  It made a great cover up. 

Wednesday, December 12, 2012

HAPPY GOLDEN BIRTHDAY, ASHLYN!!!


No card today......I wanted today's post to be for one of our beautiful granddaughters who is celebrating her 12th birthday today on 12-12-12.  Happy Birthday, Ashlyn!!!  The local radio station where they live evidently gave away a birthday cake and Ashlyn was the winner!!!  Hope she is having a special day even though she has to go to school. 

Saturday, December 8, 2012

CHRISTMAS #8


The card base is Night of Navy from SU.  I stamped the design with SU White Craft ink.  Although it doesn't show I added some glitter to the snow around the base of the church and to the large star in the sky.

Friday, December 7, 2012

Thursday, December 6, 2012

CHRISTMAS #6


The card base was run through the Cuttlebug with the Swiss Dots embossing folder.  The cute little design is from SU.  I made several of this card as well.  A variety of supplies were used for the berries -- red glitter, red gems or red dot sparklers. 

Wednesday, December 5, 2012

CHRISTMAS #5

 
When I saw this card in one of the SU Catalogs, I wanted to make some of this design.  I already had the embossing folder but ordered the stamp set.  I love the simplicity.

Tuesday, December 4, 2012

CHRISTMAS #4


This embossing folder is from Stampin' Up!  The stamp is also from SU and then punched out with the SU large oval punch.  I added just a narrow strip of dp at the top of the card.

Monday, December 3, 2012

CHRISTMAS #3


Another simple card made with an embossing folder and a simple sentiment heat embossed with Egyptian Gold embossing poweder.

Sunday, December 2, 2012

Saturday, December 1, 2012

CHRISTMAS #1

 
I am going to try to post a new Christmas card every day this month....at least through Christmas Day.  Rather than come up with a title for each card, I am going to just number them.  I have made a lot of different designs.............some extremely simple and others that took a little more time.  Because the month gets very busy with various activities, I may not always include a description, but please email me if you have any questions.  I will be happy to answer as best I can.
 
Christmas card #1 was made this year at one of the workshops I attended. All supplies were SU products.
 
Thank you for stopping by!  Your comments are always appreciated..................

Two more cards using the "All About Autumn" retired dsp. Thank you for coming by today!