Friday, February 27, 2015

HONEYCOMB DIE CUT


The honeycomb die cut on the Watercolor Wonder dp was in my "pieces" basket.  It was time to get it out and use it.  First I added it to a white card base.  The flowers from the SU Flower Shop stamp set were stamped and cut with the coordinating punch.  The top flower was popped with a foam square.  I used a two Spellbinders Fancy Framed Tags for the sentiment.  When I was ready to put the card away, I found the narrow strip of Pacific Point card stock and decided to use it instead of discarding it.
 
I still have a long way to go to use up "pieces" that I have accumulated and some may never see the light of day again. 
 
Thank you for stopping by today!

Thursday, February 26, 2015

CITYSCAPE STAMP OFF

 
It is so nice that I belong to a group of friends who get together once a year and share a lot of our supplies.  Last June, one of the gals (Sheri) shared her stamp with this design.  She was stamping the design with VersaMark and then using three different embossing powders on it.  This is my case of one that she made.  I had the matted piece in my basket and simply added it to the card base.
 
Thank you for stopping by!


Wednesday, February 25, 2015

1 NEW and 1 FROM PIECES

 
I have become a "collector" of metal dies and I am determined to start using some that I just had to have.  This card used three dies, and a stamp set with coordinating punch.
 
Let's start at the beginning.  Several months ago I purchased the Penny Black "Petals" die.  Once I got it I was intimidated by it and didn't know how I wanted to use it.  Today I cut a piece of patterned paper with it and this piece of white card stock.  The patterned piece was attached to a piece of white card stock but was put aside because I don't know what to do with it.  The white piece needed color under it but I wanted the color to be varied.  I chose a piece from the Stampin' Up! Watercolor Wonder dp.
 
I cut the 4 1/4" x 5 1/2" piece down so that just a narrow boarder of the Island Indigo card base with show and set off the whole design.  The sprig of leaves is from a Memory Box "Fresh Foliage" die.  The flowers ("SU Flower Shop") were stamped and punched. The top flower was added with a foam square for some dimension.  I felt it needed just a little more so I added an Island Indigo "hello" in the upper corner.
 
When I was organizing and going through my baskets of card pieces, I found a 4 4 1/4" x 5 1/2" piece with this design stamped an already colored.  I cut and embossed the piece with a Spellbinders Labels Eleven die.  While it was still in the die, I lightly sponged the design with Stampin' Up! Barely Blue ink.
 
Then I cut and embossed a piece of SU Real Red card stock with the next larger die for the mat.  I added the piece to a white mat that had been embossed with the Swiss Dots folder and then onto the card.
 
Thank you so much for stopping by today!!!

Tuesday, February 24, 2015

SECOND METALLIC FLOWER CARD

 
Both designs - the one from yesterday and today - are so pretty in person.  It is a little difficult to get a good picture of them because of the shine.  I used Stampin' Up! Bashful Blue and So Saffron card stock for the matted layers.  These mats were cut with Spellbinders Labels Eleven.
 
 
 I wanted to have some embossing on the front of the card but didn't want it to show on the inside, so I embossed a white piece and then trimmed it to add as a layer.
 
Thank you so much for coming by today!
 

Monday, February 23, 2015

PIECES FROM THE PAST

 
I didn't know how to put a title on this post.  Two or three years ago a friend (Harriet) gave all of us at one of our "Gatherings" some of these metallic punch out flowers. 
 
Unfortunately when I came home a lot of the items from that gathering were placed in a Rubbermaid tub and way too many were not used.  While reorganizing my room and going through that tub, I found these beautiful pieces that were crying out to be used.  Each design has four layers.
 
 
I put this flower together using foam dots between each layer.  There is another one that you will see tomorrow.  I looked at them and they are so pretty but then I wondered how I wanted to display them on a card to do them justice.  The two items sat on my table.  Things seemed to come together the next day and I am very happy with the outcome of both.
 
The white and Stampin' Up! So Saffron mats were cut with the SU Framelits Labels die set.  I embossed the white one with the Swiss Dots folder.  For the small label I lightly sponged the edges with the So Saffron ink. 
 
Be sure to come back tomorrow to see the other beautiful set.   I'm going to have a hard time forcing myself to actually send these two cards to someone. 
 
Thank you for stopping by today!

Friday, February 20, 2015

SORTING THROUGH MY DP

While I was working on filling my shelves and reorganizing things in my "craft/computer" room, I started sorting through a stack of designer papers that I just had to have when I saw them.  Many of them have been here for way too long.  I remembered buying most of them but the one I used for these two cards was one that I didn't remember. 
 
I decided that I was going to use it right away.  The flower colors paired perfectly with Stampin' Up! Wisteria Wonder card stock.  I covered the top half of the white card base with a strip of the dp.  The piece for the bottom half was embossed with a Cuttlebug folder which also has a coordinating border folder in the set.
 
The flowered paper is so delicate and I didn't want to cover up much of the design.  I had found the banner in a tub of stamps offs and die cuts that had been made at one of our Yahoo Group gatherings and used it for the sentiment.
 
 
For the second card I didn't use the coordinating border folder but just used a leftover strip of Wisteria Wonder card stock and then placed a banner on top of it.

 
I hope you enjoy seeing how you can make a pretty card without a lot of work.
 
NOTE:  I have so much 12 x 12 dp and have decided that a single 12 x 12 sheet can make a lot of cards, and I do not normally make a lot of cards that are the same.  So I have started cutting the 12 x 12 sheets into pieces that are 12 x 6.  I keep one strip for myself and then cut the second one into two 6 x 6 pieces.  I package a big variety of 6 x 6 sheets to sell at the semi-annual stamp sales.  I was still able to get four cards made with the one strip I kept for myself and have a little left over.
 
Thank you for stopping by!

Thursday, February 19, 2015

STAMPENDOUS! - Agapanthus Cluster

 
I remember when I bought this stamp several years ago it reminded me of some of the Hero Arts silhouette stamps. 
 
The background for this stamped image was done with glossy paper and alcohol inks.  Once again it was hard to get a really good picture to show the colors of the background because they look rather washed out.  The colors are actually kind of a subtle salmon and light jade green with gold metalic.  I really liked this background for the black silhouette image. 
 
This was another piece that was in my basket of future projects.  A couple of days ago I added it to a black mat, and then a vanilla mat and placed it on the black card base.  A piece of vanilla c/s was add to the inside of the card for the sentiment.
 
Sure feels good to be using up some of the card pieces that have been filling my baskets...............but I have a long ways to go to use them up.  If I never bought another new stamp or paper or anything else, I could stay busy for a lot of years.  I would eventually still need more adhesive.  I just can't seem to stop "needing" new things that come out.  Are you like that too?
 
Thanks for stopping by!
 

Wednesday, February 18, 2015

TWO CARDS FROM PIECES

 
I had already colored the sunflowers and added that piece to the brown label mat but then put it in a basket to use later which turned out to be MUCH later.    Brown Flower Soft was added to the centers of the flowers.  The vanilla card base was embossed with a folder that has random dots.

 
I had two of these pieces where I attempted to watercolor the flowers.  They were already mounted on a piece of SU Pumpkin Pie card stock that had been cut with a Spellbinders Scalloped Oval.  In one of my last SU orders I received the Filigree Frame folder.  The envelope is lined with the SU Pumpkin Pie dotted dp.
 
Thank you for stopping by! 

Tuesday, February 17, 2015

MORE ALCOHOL INK


These don't take the best pictures because of the shiny paper but I didn't have anything else on my computer at the moment to post today. There is actually very little white showing in the upper right and left corners.  
 
I chose a yellow and two shades of orange of Adirondack alcohol inks to do the background for this piece.  Then I stamped the Stampin' Up! Upsy Daisy design.  The sentiment is a die cut from Whimsy Stamps. 
 
My husband offered to put three shelves up over my craft table.  It made it possible for all of my Martha Stewart punches to be displayed instead of in jumbled mess in a box.  (One of my granddaughters will be very happy the next time she comes because she won't have to sort through the box to find the one she wants.)  All of my Stampin' Up! papers, inks, punches and stamps were already organized on other shelves.
 
I now have a lot of materials on the top shelf that had been in another room.  I hope it will remind me to make better use of them.  These are my new shelves:


And my table now has a really nice big area to work instead of piles and piles of "stuff".  There are still a couple of stacks of things that need to be dealt with but  I think I'll get there.  Since taking these pictures I now have my drawers of organized dp setting next to my table on the left side where you can see the opening under the shelves.
 
I hope to get something new made on my great work space in the next couple of days but tomorrow my husband has a project he needs my help on scanning pictures for an activity calendar.  Thanks for stopping by!

Thursday, February 12, 2015

VALENTINE #3 AND #4


I'm sorry I don't remember the company who makes the beautiful die cut on the second card, but if you have any other questions, you can email me at the address shown in the top of the right column. 
 
Thank you for stopping!

Wednesday, February 11, 2015

VALENTINE #2

 
Card #2 was made using pieces that I had already cut and in the tub with my Valentine stamps.  The dotted paper is from Lasting Impressions. 
 
Thanks for stopping by!

Tuesday, February 10, 2015

VALENTINE #1

 
I made 26 Valentines to send this year.  Six were for my grandchildren and the rest were for members of our Yahoo Group and local people who are in care centers or independent living centers.  A lot of them are very simple and I will show them later in the week. 
 
My card base is white card stock.  I then took a piece of SU Cherry Cobbler C/S and cut a large heart from it using a die from the Spellbinders Heart set.  I put those large hearts aside to use at a later date.....probably next year.  Then I chose a dp from last years's SU Season of Style paper pack and cut it down to place behind the Cherry Cobbler.  The smaller two hearts were also cut using Spellbinders dies.
 
Thank you for stopping by!

Monday, February 9, 2015

STAMPIN' UP! PETAL POTPOURRI


(Wood $27.95 - Clear $19.95)
 
The Stampin' Up! Petal Potpourri stamp set is one of the new sets that was introduced in the Occasions Catalog.   Items from the Occasions Catalog will be available through June 2, 2015.  And if you make a purchase of at least $50.00 from these items or the full catalog, you will be able to choose a free item from the Sale-A-Bration brochure for every $50.00 you spend through March 31, 2015. 
 
I chose Crisp Cantaloupe dp and ink to do the card.  The punched border was made with a Martha Stewart punch.  Once again I lined the envelope to make it more special.  The card below was made with the same materials and I sent it to my Yahoo Group swap partner with a lined envelope as well.
 
 
Thank you for stopping by!!!


Friday, February 6, 2015

HAPPY BIRTHDAY, TUCKER


I was searching my folders of saved cards and Pinterest to find a cute card to make for Tucker. There are so many cute ones made with punches and I don't think he is too old for one like this.  Doesn't everyone love puppies? 
 
The ears and paws were made with the Stampin' Up! Build a Flower punch (not sure if that is the right name).  I used a Spellbinders circle die for the head.  The eye were punched using the "Owl" punch.  The original card I saw used an ornament punch for the nose but I didn't have that one so I used two sizes of Spellbinder oval dies for the nose.  The smaller one was cut in half.
 
Instead of embossing the red portion of the card, I stamped paw prints with VersaMark and then stamped the sentiment over them with VersaFine black ink.
 
This card was so much fun that I made two more for when my mother needs them for two of her great-grandsons.  I hope you will take a moment to leave a comment.  I really enjoy knowing what you think. 
 
Thanks for stopping by!!!  Have a GREAT weekend.  I think we're in for more snow on Sunday!

Thursday, February 5, 2015

BIRTHDAY CARDS

Our grandson's birthday is Saturday.  Both my mother and mother-in-law asked me make cards to send him. 

 
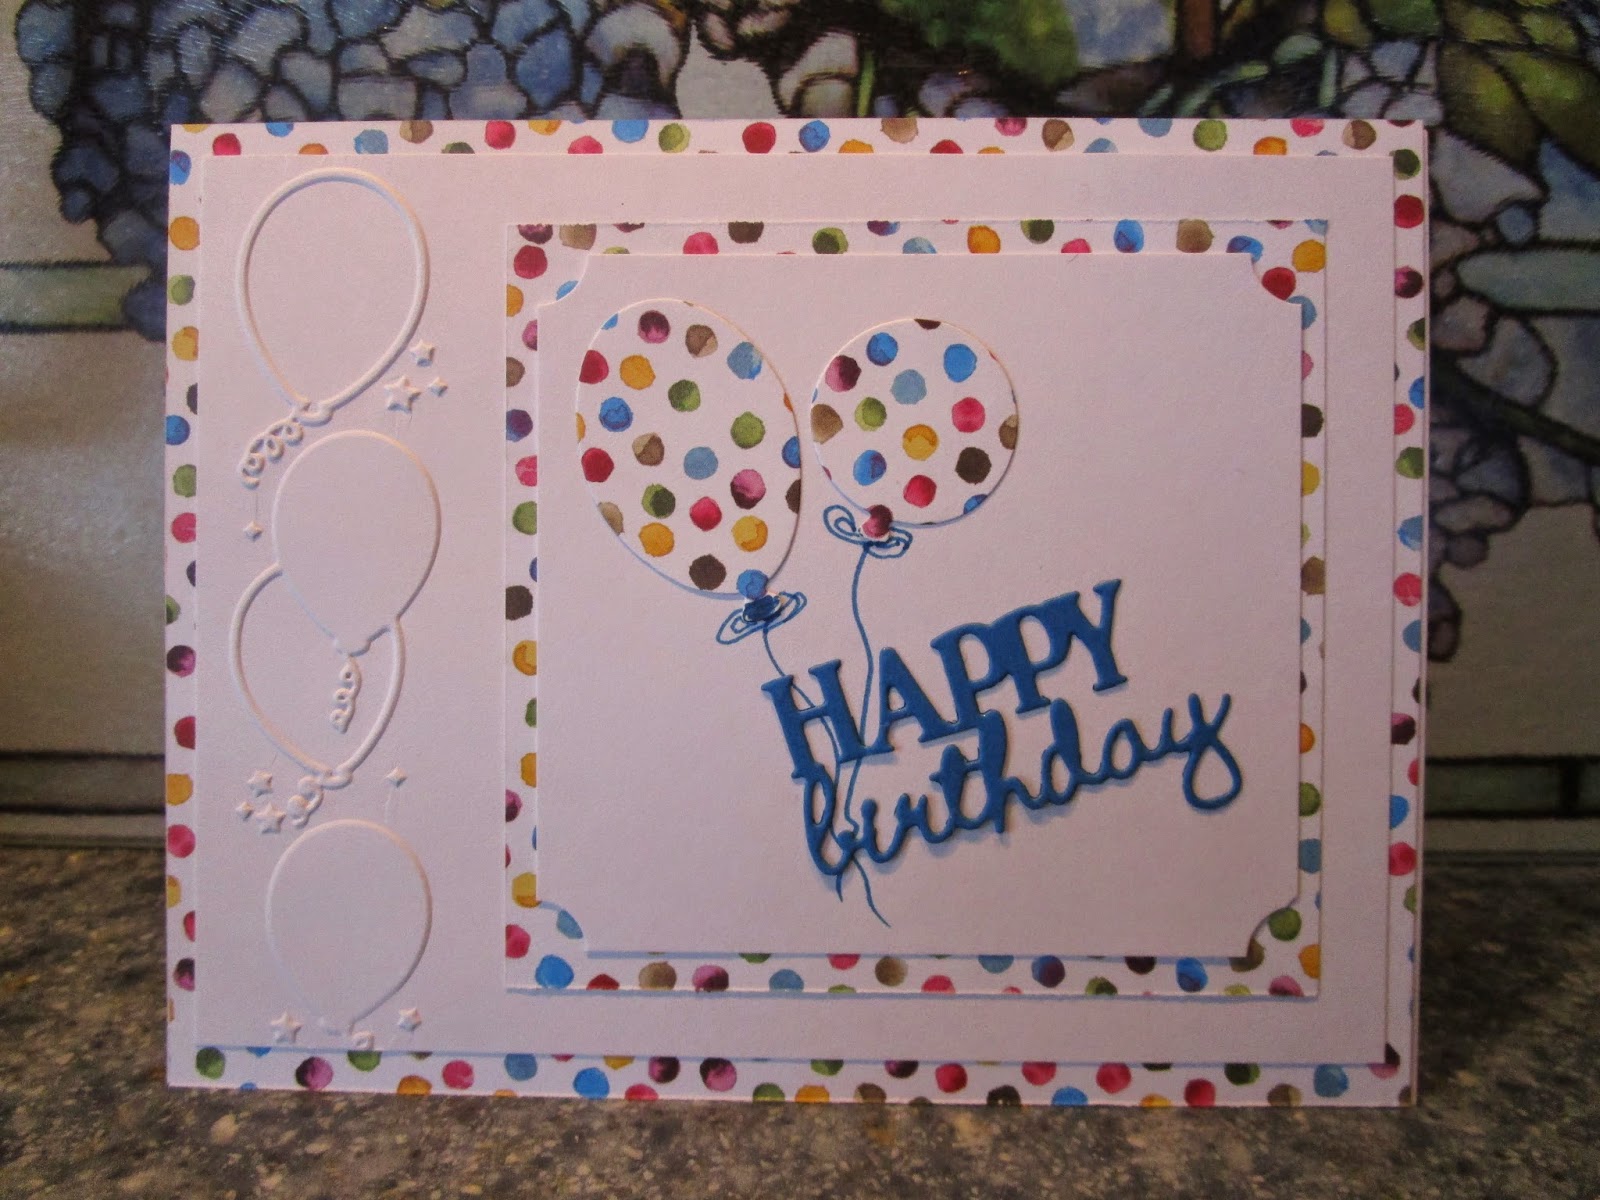
I had a few scraps of this SU designer paper on my table and wasn't sure how I was going to use it but I thought it would make a great background for a "happy" card.  I covered the white card base with a 4 1/4" x 5 1/2" piece of it.  Using a Darice folder, I embossed the edge of a white 4" x 5 1/4" piece of card stock. 
 
I didn't want to put the design on the wide open space next to the embossed balloons, so I measured the open space and then cut another piece of the SU dp.  The white top layer was then cut 1/4" smaller on each side and added.
 
I had a Marvy punch that I used for the balloons and then just drew in the strings with an SU Pacific Point marker.  The "Happy Birthday" is a die cut from a Whimsy Stamps set.
 
 
Our grandson plays Little League Baseball in the summer.  I've had these Charlie Brown stamps for such a long time and don't think I had ever used them.  In fact, I had them out to think about selling them.  Now I'm glad I didn't.  Their school colors are orange and black although the uniforms for baseball aren't, but I still went with the orange and black since it made a brighter card.

 
The second stamp also had Charlie Brown pitching and since Tucker has tried pitcing some with his team I stamped, colored and then carefully trimmed the image to adhere to the inside of the card.
 
Although he will be glad to get the cards, I'm sure he will be more interested in what is inside. 
 
Hope you will take a moment to leave a comment.....I always appreciate hearing from you.  Thanks for stopping by!  Be sure to come back tomorrow to see the cute card I made for us to send Tucker using punches.  (Just a teaser)

Wednesday, February 4, 2015

USING ALCOHOL INK BACKGROUND

 
Yesterday I was going to post this card but I was having major computer problems AGAIN!  I did spend a lot of time working on cards though and have some fun ones to show in the next few days.

I mentioned on an earlier post that I had been having fun working with alcohol inks on glossy card stock.  This is one of the backgrounds I came up with .  I stamped the design from the SU World of Dreams stamp set.  The "Happy" was stamped and the "Birthday" is a die cut that I added.   The alcohol inks went well with the SU Pacific Point card stock. 

It is hard to get a good picture of glossy paper backgrounds.  I didn't use a flash but the photos all seemed to "wash out" the color some.

Since you stopped by, won't you tell me what you think?  I always appreciate your comments.  Hope you are having a great day!

Monday, February 2, 2015

STAMPIN' UP! - Wonderous Wreath

 
Yesterday Winter really showed it's face here in Iowa.  At our house we got at least 10 inches of snow.  Fortunately we have a good sized snow blower to handle it.  Our bird feeders were empty so I "weathered the snow" and took feed out.  I was so glad I did because we had Cardinals coming like crazy.  We had at least 4 males and 3 females.  We've never had more than a single pair at a time in the past.  We also had several Junco, House Finch, Gold Finch and naturally sparrows as well.
 
I think I spent almost the entire day at my stamp table and had so much fun.  One of the ladies on our Yahoo Group made a card very similar to this and I thought it was just beautiful so I cased it for today's card! 
 
The card base was embossed with an SU Filigree Frame embossing folder.   The wreath was done using two different stamps and two colors - Pear Pizzaz and Wild Wasabi.  There are two dies to cut out the wreath and it can be done in one step.  After adding the wreath to the card base with foam squares, I punched six pink flowers, assembled them into three flowers and added a tiny pearl to them.  They are attached to the wreath with glue dots.
 
Since you stopped by my blog, won't you take a moment and tell me what you think?  Thank you so much for coming by!

This is the  video  I used to make this card using more retired dsp. After I finished, I was a little dissatisfied with the white background...