A few weeks ago I saw a card on Selma's Stamping Corner that I just knew I had to try to case. She truly has so many beautiful cards on her blog. You'll have to check her out. The flowers and leaves on this card are made of colored vellum.
The white punched area is made with a Martha Stewart punch, punching it twice and then cutting off the plain edge and then overlapping them to get the scallop on each side. The flowers are made with the Hydrangea punch (large flower) and the Hydrangea punch with medium and small flower on it as well as the MS Rose Leaf punch.
The stamped flower is from the Flourishes Violets set. I colored it with markers but was disappointed that they didn't match the color of the vellum as well as I would have liked. The flowers could also be made from plain vellum and then colored with the same markers that you use on the design. I could also have stamped a sentiment on the oval instead of another design which would have eliminated the difference in color.
It's the end of another month. Where has the year gone?
Thanks for stopping by............come back again soon.
Wednesday, June 30, 2010
Tuesday, June 29, 2010
FOR MY FRIEND....
This is a birthday card I sent to a friend (Joyce). It is one of the first cards I have completed with a Magnolia on it. Another friend, Andrea, has been so kind to let us use her Magnolia stamps to make stamp offs. I have colored some of them but hadn't take the time to cut them out and use them on a card. I love this little cutie and she is so easy to color.
The papers are from a Basic Grey "LilyKate" 6" x 6" paper pad. Ovals were cut using my Spellbinders Classic Oval dies. The flower is from a package I purchased from Hero Arts.
Thanks for stopping by................come back again soon!
Monday, June 28, 2010
REPEAT IMPRESSIONS - REBECCA
Two of my friends, Harriet and Lynette, are on the design team for Repeat Impressions Stamps. A new stamp is released each week and when I saw the cards they made with the stamp "Rebecca" I knew I had to have it. Friends are such enablers! :)
I stamped the design on white card stock first and then again on the patterned paper which was in the LilyKate paper pad from Basic Grey. I cut out the pieces I wanted to piece onto the white card stock and adhered them. I then colored the hair, her arms and legs with my Copic CIAO markers. The white layer was then attached to the solid green paper and then onto the patterned paper - both of which were also from the same paper pad.
The butterfly was punched with a Martha Stewart punch. I added the three gems and then wanted to outline the butterfly with Crystal Stickles. I smudged one edge so just took my finger and smeared the Stickles over the entire portion of the wings.
This was my second attempt at paper piecing. It really is fun so if you haven't tried it, you really should. It just adds so much to the design.
Thanks for stopping by...........hope you come back again soon!
Sunday, June 27, 2010
IOWA BASEBALL MUSEUM OF NORWAY
The town of Norway has a rich history of baseball. Three of its residents went on to play major league baseball - Mike Boddicker received the MVP award in the World Series when he played for the Baltimore Orioles. Hal Trosky, Jr. and Bruce Kimm were the other two players who played for major league teams. Several others were drafted or played for minor leagues.
In July of 1991 the Norway High School Baseball team won its 20th State Tournament title. This was a particularly meaningful win since it would be the last baseball game that would be played under the Norway High School name. Our school had been merged with a neighboring school beginning in the Fall of 1991.
On Saturday, June 26, Norway enjoyed the Grand Opening of the Iowa Baseball Museum of Norway which hosts all 20 State Tournament trophies and a multitude of other history regarding the history of baseball in this town and a lot of other facts pertaining to our town. After hours and hours of work over the last two years, the museum opened in February 2010 but the Grand Opening was held off until the time of year when baseball games, a parade and other activities could be planned for the celebration. If you're ever in the area, stop by and see it. It has received very high reviews.
Our oldest daughter decorated and drove our golf cart in the parade while the grandchildren threw out candy along the parade route. They had a ball!
Thursday, June 24, 2010
PAPER PIECING
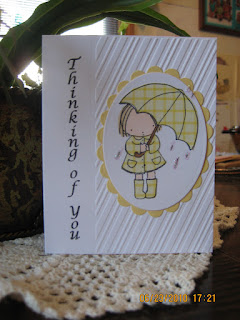
Today I am showing you my first completed project with a stamped image that I did paper piecing. Some of the ladies on our Yahoo group have done it and I loved the affect of it but I was always afraid to try it. It can be difficult holding on to tiny pieces while trying to trim them but I'm so glad I finally gave it a try. I managed to complete two cards doing this yesterday.
The design is a Pure Innocence from My Favorite Things. My friend Harriet was so kind to let me borrow three of her sets to give this a try. First I stamped the Thinking of You down the left hand side of the card front and ran the remaining portion of the front through my Cuttlebug using one of the CB folders. I liked the affect of the design with the "rain drops" on the stamped image.
Next I stamped the image on white card stock leaving a good border all the way around the image and then stamped it again on some scrapbooking paper that I have in in my "stash" for a LONG time.
The stamped image on white was cut out using one of the Classic Oval Nestabilities. Using my Copic CIAO markers I colored in the areas that would not be covered with the yellow pieces. Then I very carefully added the yellow paper pieces. The Yellow scalloped layer was cut from Banana Cream card stock from Lasting Impressions. Both layers were then attached to the front of the card.
Thanks for stopping by................hope you come back again soon.
Wednesday, June 23, 2010
BABY CARD
One of the members of our Yahoo Group (Georgia) recently was blessed with her first granddaughter. Since the birth happened just a few days before our group met in Des Moines last week, I was able to deliver it in person.
I believe the paper on the front of the card was purchased at Archivers in Des Moines - probably last year when our group met there. The stamps are from Paper Inspirations and the designs were colored with SU markers. The stamp set also has a baby face without the bow so it can be done up for a baby boy as well. I used the matching SU card stock to make the scalloped squares with my Nesties.
Thanks for stopping by.............come back again soon.
Tuesday, June 22, 2010
JUSTRITE ANNOUNCEMENT
If you are interested in the newest JustRite Stamps, click on this link and you can see pictures of the new ones. Then let me know if there are any you are interested in ordering.
http://heartwarmersforjustrite.blogspot.com/
Monday, June 21, 2010
SPECIAL OFFER
I have something special to offer you today. This is a Clear Stamp Set from Hero Arts. .... A Million Thanks. The set retails for $15.00. You can buy this one for only $7.50 plus $2.50 for shipping. It is new and hasn't even been removed from the wrapper. Email me at vboddicker@aol.com if you would be interested in purchasing it.
THANK YOU NOTE CARD
I recently saw a card somewhere which was the "inspiration" for this card. The one I saw was a vertical card and had a couple more layers. In looking at this picture the white layer looks like it has a wider border on the top..........maybe the angle of the picture.
I really like working with Kraft cardstock. It just seems to give a completely different look to the cards. I stamped these flowers on Lasting Impressions Banana Cream paper (which is now retired) and leaves on Stampin Up! Wild Wasabi card stock with a Papertrey Ink stamp set and cut them out. The "Special Thanks" is a My Sentiments Exactly stamp.
When our Yahoo group of friends met last week we had an exchange of "Thank You" cards and this is the one I made for that exchange.
Thanks for stopping by.................I love knowing what you think of the cards.
Thursday, June 17, 2010
GROUP GATHERING
I am so fortunate to be part of the most wonderful group of gals on Yahoo. We have so much fun making cards and sharing our ideas with each other........not to mention all of the enabling we do. On Sunday, June 13, 11 of us met in Des Moines, IA. Two ladies flew in from California, two drove here from Illinois, two drove in from Omaha, one from Minnesota and four of us from Iowa. This was the fourth time to meet for some of us.
The first day we met at Heirloom Designs in Valley Junction where we shopped and started the buying portion of our trip. In the evening we went to The Machine Shed and had a wonderful meal together. Here are some pictures of my wonderful friends.
Joyce, Kris and Joanne
Dawn and Terri
Dawn and Terri
Sherri, Lynette and Andrea
Char was unable to attend so she sent this great "paper doll" so she would be a part of the gathering. "Char" was with us everywhere we went and a part of many pictures.
The Archivers where we met on Monday reserves the large room just for us. So nice of them! We are there when they open and stay until closing time other than a brief time out for lunch at the Jordan Creek Mall.
The last two years we would return to Archivers for the morning, have lunch and part ways. This year Harriet was able to arrange for a trip to Taylored Expressions where we received a very warm welcome. Taylor had a "make and take" project ready for us.
This is the card we made at Taylored Expressions. (I'm afraid I got the sentiment on mine a little crooked.) We were then invited to shop and purchase products from her inventory. She also treated us to cupcakes and lemonade along with a special gift bag for each of us.
Taylor, if you read this blog, I hope you know just how much all of us appreciated your generosity and hospitality. It was a very special time for all of us. THANK YOU!
We left Taylored Expressions and had lunch together before Andrea had to leave for the airport. But we couldn't part company until we had one more time to shop together. Leaving is always hard because we have so much fun together...........but THERE IS ALWAYS NEXT YEAR!
The visits from everyone on my blog page are appreciated. Hope you come back again soon!
Saturday, June 12, 2010
BUTTERFLIES
This is a minor variation of a card I posted a while back which was a case of a card my friend Harriet made. The card base was run through the Cuttlebug using the Swiss Dots embossing folder. The green papers are from a Basic Grey paper pad. The right edge of the printed paper was punched with a Martha Stewart punch. I had a scrap of the solid green and adhered it to the print. The white square didn't quite fit so I just extended the top and bottom square beyond the green strip. Butterflies were punched with a MS punch.
Life is busy right now so I may not be posting again until next Wednesday, but thanks for stopping now. Hope you come again soon.
Friday, June 11, 2010
A GRASS SILHOUETTE
I love cards that have brayered backgrounds and a black design stamped on top. I am very much looking forward to taking a class from Michelle Zindorf in August.
I should have posted this one first since I didn't do as good brayering the background on this one. I used the same papers and colors as I did on yesterday's card so it doesn't need much explanation. The grass design is a Stampscapes stamp and the butterfly is one from a set of 3 butterflies from Inkadinkadoo.
Thanks for stopping by.....................hope you have a great weekend!
Thursday, June 10, 2010
BRAYERED BACKGROUND
Recently I needed a card for my friend, Sheri and her husband.
The card base is white card stock. Using a brayer I applied four VersaColor inks onto a piece of white card stock. Starting with Canary, then Marigold, followed by Orange and Topaz I inked the entire piece. Then I stamped the SU Upsy Daisy with VersaFine Onyx Black ink and stamped the design in the corner and added the stamp of a small butterfly. The sentiment is from the Upsy Daisy stamp set.
The black and white piece of card stock is from Lasting Impressions and framed the stamped design perfectly.
Thank you for stopping by...............please come again soon.
Wednesday, June 9, 2010
MONKEYING AROUND
Recently one of my nieces had her first baby - a little boy named Evan. She had decorated Evan's room in a "monkey theme". I realize this doesn't look like the typical baby card but then I'd like to think that these are all young baby monkeys hanging around. They look very playful. Our Yahoo group has an alphabet swap and this month the letter was "M" so I made a card just like this for the swap.
The "Swinging Monkeys" stamp is from DeNami Design and the designer paper is one I have had in my stash. The stamped design was colored with Copic markers and then mounted onto a piece of SU Wild Wisabi card stock before adhering it to the front of the card.
Thanks for stopping by..................hope you are having a wonderful day!
NEW JUSTRITE STAMPS
This is just a quick note to let you know that if you have seen the new JustRite stamps that are available or will be available soon, they have some great new designs. Let me know if you'd like to order any of them. I will try to get pictures of them posted on my JustRite blog page ASAP. I'm a little behind due to working at the Primary elections yesterday from 5:45 AM until 10:10 PM and I'm not operating at full speed today. :)
Saturday, June 5, 2010
SPELLBINDERS CROSS
My final cards I will be posting in this "theme" were made using the Spellbinders Cross and Labels 11. The Cross set has four sizes all of which are a different design.
Card #1: I used two of the shapes for this card. I cut and embossed each of them. The smallest cross on top had a cut out design in the center that I thought made the design look unfinished when the three were layered so I applied a gold sticker cross in the center. The middle cross is attached using pieces of pop dots to give the card dimension.
Card #2: I used off white card stock instead of the white. Three shapes were used for it popping the final two layers. The smallest cross also had a very tiny cut out hole so I attached a tiny gold flat metal gem and I really like that card the best.
I think the "white" card stock would be my preference to use if I were making it for a Baptism/Christening. Otherwise I think the off white has a richer look. I think this design will be appropriate for Baptisms, Confirmations, Sympathy and for Church Pastors.
Thank you for looking...............tell me what you think.
Friday, June 4, 2010
ODB CROSS
Today's card is another one I made for the two occasions coming up that I mentioned yesterday. The Cross is from a set of stamps from Our Daily Bread and was heat embossesd with my favorite Egyptian Gold embossing powder.
Layers were done with Spellbinders Labels 11 which I really like. Papers are off white and gold shimmer paper. The embossesd background again was done on a separate layer and attached to the card front so the embossing would not be on the inside of the card.
Thanks for stopping by.......................would love to hear what you think.
Thursday, June 3, 2010
RELIGIOUS
Our priest is being transferred in a few weeks and I needed to make a card to give him at the Farewell Potluck. I also needed a card for a former priest who is celebrating 50 years in the priesthood. We are having a special service here this weekend for him and a potluck dinner afterward. Well, it turned into my mother-in-law also wanting two cards and a friend of hers wanted one. I don't have a lot of religious stamps but was able to come up with enough for all of us.
The design on this card is from Our Daily Bread designs. I really like it. I stamped it with VersaMark on off white card stock and embossed it with Egyptian Gold embossing powder. Then I cut out the image with a Spellbinders die. The gold shimmer paper was cut out with the next larger Spellbinders die in that set.
I didn't want the front of the card to be embossed so that it showed on the inside of the card so I embossed a separate layer with a Cuttlebug embossing folder and attached it to the front. The last step was to adhere the layers with the design.
Thanks for stopping by.....................would love to know what you think.
Wednesday, June 2, 2010
JUNE CALENDAR
The month of May sort of slipped by me and all of a sudden I realized that I had not done anything with my June 2010 Calendar. I guess this would be what you call a CAS calendar. I've been working on a lot of other types of cards and my mind was blank for what to put on mine short of copying the idea of a friend.
The Rose is the Flower of the Month and I have the monthly flower stamps from SU so it made a quick and easy design to use this month.
FOR FATHER'S DAY
I saw a card similiar to this on SCS and just loved it. I already had the stamp set Autumn Days from Stampin' Up but hadn't ever used it. The stamped portion of the card is pretty much the same as the one I saw but instead of designer paper at the top I took a piece of the Chocolate Chip paper from SU and embossed it with one of the Cuttlebug border embossing folders. I don't usually try to put ribbons or flowers on card for the guys so I was pleased with how this one turned out.
Thank you for stopping by......................tell me what you think.
Subscribe to:
Posts (Atom)
Two more cards using the "All About Autumn" retired dsp. Thank you for coming by today!
-
Card #13 Card #14 I had a request to post a picture of all of these cards together so after I scheduled this post, I too...
-
These were suggested layouts used for the pieces that were cut however I did make some minor changes on the ones I made. I'm ...
-
I saw a card on Pinterest using this layout. I chose different papers which made my card a different color than the one I saw. The sen...