Friday, May 31, 2013

ONE MORE PINK AND BLACK

Today we were supposed to leave on a road trip to Pennsylvania and my high school friend and her husband were going to fly in from Texas to meet us there.  From there we were going to go to New York City together, but those plans had to be canceled because my husband has developed a kidney stone for a 5th time......yes 5 times now. 
 
It's not all bad....he's not in pain due to the location of it and it is giving us the opportunity to do some other things during the 13-14 days we had planned to be away.  It allowed me to post cards that might not have happened while we were gone and it is allowing me to take part in a stamp sale which hopefully will give me some funds to help enable my addiction to stamps and other neat products.
 

I really hadn't planned on posting another pink and black card, but I had this butterfly that had started off as a GOOF.  Rather than let it go to waste I decided to use it and share what I did by mistake.
 
This was actually the first butterfly I made before the one I posted earlier.  My intention was to ink the stamp with VersaMark and then before stamping, ink it with black ink.  After doing that I stamped it onto the pink card stock.  I mistakenly grabbed a container of glitter instead of embossing powder. 
 
When I realized what I had done, before heating it I sprinkled it with clear embossing powder.  It actually worked out OK.  The embossing powder over the glitter made the glitter stick.  The spots on the butterfly do look more gray than black but I like the sparkle.
 
So you see.......sometimes mistakes actually don't end up being mistakes but a new technique.  Thanks for stopping by!  Let me know what you think.

Thursday, May 30, 2013

PINK AND BLACK CARD SWAP


A few days ago I made this card to send to my friend, Georgia, for a card swap that our Yahoo group was having.  The basic idea came from a similar card I saw on Pinterest but I put my own touches on it.
 
The largest butterflies were made with an SU punch.  The other sizes were made with a couple of different Martha Stewart punches.  I used my white gel pen to add tiny white dots on the black butterflies just to give them a little more character.  The border on the black background was also made with a MS punch.
 
Recently when I placed an order for customers, I purchased the Penny Black "Say it with flowers!" stamp set.  The sentiment I used on this card is from that set.
 
Thank you so much for coming by!  Comments are always appreciated!

Wednesday, May 29, 2013

HAPPY ANNIVERSARY, PAM AND ALLAN


As I mentioned two days ago, May 29 is the anniversary of the friends we have had ever since high school.  This is the card I sent to them.  I hope they are having a special celebration of remaining such a very special couple.

Tuesday, May 28, 2013

GRADUATE


The grandson of one of our friends is graduating and the party was this weekend.  These are the school colors where he attended.  The card base was embossed with a Darice folder. 

Monday, May 27, 2013

GRADUATION DAY


On May 27, ???? (too many years ago to tell you) I graduated from high school.  It is a date easily remembered because 2 days later I stood up in the wedding of a life long friend who graduated with me.  Even though she and her husband live in Texas now, all these years later we are still best of friends and have taken one vacation together and are planning another. 
 
Our school colors were purple and gold but in May of 1991 the last class graduated from our school and our school merged with a neighboring district. 
 
When we are invited to graduation parties, I like to make a card for the graduate in their school colors.  Because we tend to get most of the invitations for this school district, I make several in blue and gold.  The circular stamped design is made with a JustRite set of letters.  I leave the letters in the round wood mount and just have to change the year.
 
Thank you for stopping by!

Sunday, May 26, 2013

FRIENDS ARE LIKE FLOWERS


The colors didn't blend as well on this one but I decided to show it to you anyway.

Saturday, May 25, 2013

BIRTHDAY WISHES


It's a busy weekend so I am just going to show you a card each day through Monday.

Friday, May 24, 2013

WATERCOLOR PENNY BLACK "Lofty"


The Penny Black stamp I used for this card is actually about another 2 inches tall, but I was making square cards so just used this portion of it.  I colored the stamp with markers.  The blossom was colored with a yellow and a bit of orange and then spritzed with water.  After the image was completely dry, I added the cute little butterfly and sentiment.

Thank you for stopping by!

Thursday, May 23, 2013

FLUTTERBY WEDNESDAY 241


This week the FBW challenge is to use the above sketch but also be sure to use a butterfly or fairy on the card.


I had just finished working with pink and black for a swap card which will be shown in a few days.  (I have to let the recipient see it first.)  So this is the card I made with those same colors for the FBW241.
 
I stamped the Penny Black butterfly two times using VersaMark and StazOn Black Ink so that I could add clear embossing powder to the images.  I attached the one stamp flat on the white square but then attached the second butterfly on top only in the center so that I could flip the wings.

WATERCOLOR TULIPS


One thing I have not done for a very long time is to try inking a stamp and then spritzing it with water to give a "watercolor" look.   The stamp I used is from Penny Black - Brush Tulips,.  Using 2 different shades of lavender and a green marker, I colored the stamp spritzed it lightly with water and then stamped it.  The vertical sentiment stamp is from Paper Inspirations.
 
The image layer was mounted onto coordinating green and lavender layers before attaching it to the white card base.  This also made a great image to use for a 4 1/4" x 4 1/4" square card.
 
Thank you for stopping by!

Wednesday, May 22, 2013

2 MORE CARDS WITH POPPIES


I'm sorry to give you two more cards with these poppies, but I just had too much fun making them with different colors. 

Tuesday, May 21, 2013

MORE "Blooming Garden" STAMP SET

 
Using the same stamp that I used yesterday, I made a 4 1/4" x 4 1/4" card which is something I rarely do.  (But watch for more in the next few days.)  For this one I colored it with regular markers.    If you didn't see yesterday's post, this is the Penny Black stamp set I used:
 
 
You can order this stamp set for $12.25 plus $1.85 shipping if you email me at the address on the right side of this blog.
 
Thank you for stopping by!

Monday, May 20, 2013

PENNY BLACK "Blooming Garden"


I really like the "Blooming Garden" stamp set from Penny Black.  I think this is the first card I have posted using the set.  Using my Copic markers I used three different shades of the "R" colors to do the shading. 

My original idea was to just use the stamped image in the lower corner with a sentiment but it left a little too much white for my liking.  I haven't been making use of the many Martha Stewart punches that I have so I punched the border using black card stock.  I like the "bold" black with the color used on the poppies.
 
Here is a picture of the stamp set which I can order for you if you would like it. 


The price would be $12.25 plus $1.85 shipping.  Just email me at the contact information on the right side of this blog.
 
Watch for another card with the poppies tomorrow.  Thank you for stopping by!

Tuesday, May 14, 2013

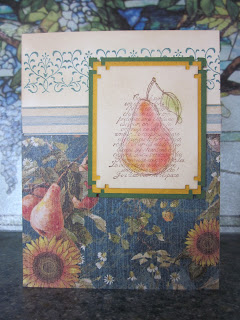
FAITH IN NATURE


This card was planned around the beautiful paper from Graphic 45 "French Country Collection".  I cut a piece to cover a little more than the bottom 2/3 of the card.  Since the dp is double sided, I used a strip of the striped side across the top edge. 
 
The next step was using the pear stamp from the SU stamp set "Faith in Nature" which was perfect with the pear in the dp.  I stamped it with Close to Cocoa ink on ivory card stock.  Using a Q-tip I added Crushed Curry and then went over that with Cherry Cobbler.  The leaf was colored with Old Olive.  The ivory card stock was too bright so I sponged over the entire piece with Antique Linen distress ink. 
 
When I went to add the stamped layer to the Crushed Curry card stock, the Curry layer seemed to be too bright so I sponged the distress ink over it as well to tone it down.  The bottom layer was then added.
 
The top of the card was still plain and needed something so I stamped the border on with Blue Bayou ink and again the ivory card stock was too bright so I sponged over the entire border area with distress ink.
 
I really like the result I got on this card and hope you will tell me what you think.  Thank you for stopping by!
 
(P.S.  If you like this paper, I can get the Graphic 45 paper pad for you at a discount.  Just let me know if you'd like to order.)

Monday, May 13, 2013

PENNY BLACK "Scented Garden" STICKERS

If anyone is interested in these stickers, I have several sheets that I would sell for $2.00 each.  Below is a card I made with one of them.


There was a sample card in the materials I receive from Penny Black using this sticker.  It looked like it had been added to some card stock and then die cut with a matching frame.  They said it wasn't so someone really had a smooth hand to cut it out the way they did.  The edge of this sticker is actually that dark burgundy color.  I have a lot of Spellbinders and other dies and discovered that one of the Spellbinders dies had the same shape so maybe that's what someone at Penny Black had used to design this sticker.
 
I attached the sticker to SU Cherry Cobbler card stock and die cut it with Labels Four.  The card base is an A2 size.  I cut a piece of ivory card stock that was  5 1/4 x 4 inches.  The "script" background stamp was not the full size so I had to stamp it three times to get the layer fully covered.
 
Remember you can order Penny Black items from me any time and at a discount.  Thank you for stopping by!

Sunday, May 12, 2013

HAPPY MOTHER'S DAY

Since I don't have a new card to post for today, I am pulling up a card from a previous Mother's Day.
 
 
I'll be back tomorrow.


Saturday, May 11, 2013

HOT AIR BALLOONS


This is one of the most detailed designs I have ever colored.  I purchased this stamp a year ago in Branson MO because I like hot air balloons.  Once I got it home I was struck with what a challenge this one was going to be for me.
 
The stamp is from Northwood Rubber Stamps. I colored it with Copic markers and then mounted it onto a layer the two layers of card stock before attaching it to the card base.
 
We have never been to New Mexico when they have that hot air balloon festival but sure would like to see that someday.
 
Thanks for stopping by!  Your comments are always appreciated!

Friday, May 10, 2013

JUST BELIEVE

 
I am just going to post this card for you to see without any explanation.  If you have questions though, please let me know and I'll get back to you.  I just need to catch up after being gone for a few days.
 
Thank you for coming by!

Thursday, May 9, 2013

THREE VARIATIONS OF SAME DESIGN

 
I saw a card very similar to this on Pinterest.  The card I saw used the same color for the doily but stamped a different design in black on top of it.  I also used a different sentiment.  The stamped image was added to a piece of Pear Pizzazz card stock.  I also changed the card base to black instead of a white card base that had been embossed as was the one on Pinterest.

 
I love the doily stamp so I decided to make a second one using Baja Breeze and Not Quite Navy.  This one needed some more darker color so I added the punched butterflies.   I wasn't as happy with the color combination so............


I made one more.  This one I really like.  I used Crumb Cake for the doily and Not Quite Navy for the accent color.

Thank you for stopping by!

Wednesday, May 8, 2013

BUTTERFLIES

 
This is another idea I got from Pinterest.  Very simple to do with various images.  Thanks for stopping by!

Tuesday, May 7, 2013

STILL MORE PENNY BLACK


This is another idea I picked up from Pinterest.  I love the masked area that was used for the colors.  The card on the left is pretty much like the one I saw.  The card I cased did have a background stamp under the colored area that was music.  I did stamp one there too but the color of ink I used didn't allow it to show the sponged inks. 

I decided to make a second card using Hero Arts Soft Wheat Shadow Ink for the music background and then sponged the pink and gray inks while the area was still masked.  After removing the post-it notes which I used to mask the strips on both cards, I stamped the image with VersaFine Onyx Black ink.  The second card had just a really light smudge from my finger so I punched a butterfly and covered the smudge.  (Shhhhhh......Don't tell anyone.)

Thanks for stopping by!

Monday, May 6, 2013

MORE PENNY BLACK "Delicate Florals"

 
I saw a card on Pintrest that was made using the vertical image this way and really liked the looks of it.  I masked the lower portion of the card to stamp the image sideways and then masked the top portion of the card to stamp the same image in the opposite direction.  The image was colored with two colors of markers.
 
Next I cut a black piece of card stock that was the perfect width to fit between the stamped images and a white card stock that was slightly narrower than the black piece.  This strip was added to the blank space and the card was finished.
 

The card first card went so quickly I decided to ink up the design again but used ivory card stock for the layer and card base.  This time I was going to use Copic markers and I mistakenly inked it with VersaFine Onyx Black ink.  Using my Copics (which are showing up awfully light here) I just pounced the color into place so the black ink would not smear.  I went around the entire image with a VERY light green copic which does show up on the actual card but not sure you can see it here.
 
Copic makers bleed through most card stock so to set the image off even further I cut down the layer with the image and mounted it onto a black layer and then onto the ivory card base.  I really like the black layering to set off the entire image.  A finishing touch was adding just little dots of Sticklers here and there.

Saturday, May 4, 2013

BECAUSE YOU'RE SPECIAL


I just finished this card and decided to post it since I didn't have anything scheduled for today.  The card is a standard 5 1/2" x 4 1/4".  I cut a second white piece that is 5 1/4" x 4".  The Penny Black Slapstick/Cling stamp set "Delicate Florals".  (A picture of the stamp set is shown at the end of this post.)  The image was stamped with Memento Tuxedo Black ink so I could color it with Copic markers and not have the black ink smear.  I then stamped the sentiment and added just a tiny touch of tickles in the center of the three tiny flowers.
 
Next I cut a piece of black card stock which measures 5 3/8" x 4 1/8" to use as a mat.  The image was attached to the black mat and then added to the front of the card on foam squares.
 
I like the CAS look of the card and love that image.  Remember Penny Black is a company where I can order items for you at a discount.  Thank you so much for stopping by!


Friday, May 3, 2013

LOVE FOR BIRDS


Since the loss of our furry friend "Okie" about three years ago, I have had to make due with putting out some bird feeders. It actually has been fun getting a nice variety of feathered friends visiting us.

As promised yesterday, this is the other set of three stamps that are in the Papertrey "Take Three Summer" stamp set.  I'll try to clearly explain how I did the section with the birds.  I have a "template" that I made with white card stock using the die that cuts the three squares evenly spaced.  I place the template on my craft sheet and then place each stamp centered in one of the squares with the stamping side down.  Next I take an acrylic block and place it on top of the clear stamps, lift the block and then ink the stamps with VersaMark ink.  The designs were then heat embossed with Opaque White embossing powder on a piece of Baja Breeze card stock.  See pictures at the end of the post showing the steps described.

My next step was to get a border to place over the stamped images.  I used a piece of Not Quite Navy card stock which was larger than I needed and die cut the three squares with the die.  Here is a picture of the die that goes with the clear stamp sets. 
 
The frame was pretty narrow so I used dots of Tombow Mono glue to attach the two pieces. The card base had been embossed with a Cuttlebug Swiss Dots folder before adding the bird images. Then I added the punched design under the birds.
I'm not sure if I explained this very clearly, but please feel free to ask questions. Here are the pictures of how I spaced the images:
 
The Papertrey die


The template I made with the die
 
The stamps face down inside the squares
 
Placing the acrylic block on the stamps
 
THANK YOU FOR STOPPING BY!


Thursday, May 2, 2013

WHERE IS SPRING?????


When the temperature outside is only 39 degrees on May 2, I am wondering when Spring is going to happen.  Just west of us they are receiving light to moderate snow!!! And we may actually get a trace to 1" later today or tonight.
 
The stamps I used for today's card are from a Papertrey "Take Three Summer" stamp set.  There are stamp sets for each of the seasons and each set has two sets of three coordinating designs.
 
I used SU Baja Breeze and Not Quite Navy card stock for the card.  The flowers were stamped with VersaMark and then heat embossed with Opaque White embossing powder on Baja Breeze card stock.  I wanted just a very narrow border around of the light blue to show so I had to trim the squares by hand.  None of my dies were quite the right size.  Next I added each of those pieces onto Not Quite Navy card stock and trimmed them down by hand again.
 
I wasn't quite sure what I wanted for the Not Quite Navy piece on the right side of the card but I did the border with a Martha Stewart punch and then embossed the remaining portion with a Sizzix folder.
 
NOTE:  You may notice that two of the flower squares are the same.  Unfortunately when I took the 3rd design from the case, the piece tore and wouldn't have looked good with the other two.
 
Tomorrow you will see a card I did today using the same colors but the other designs from the stamp set and a different layout.   Hope you come back again tomorrow.
 

Two more cards using the "All About Autumn" retired dsp. Thank you for coming by today!