Wednesday, March 31, 2021

ONE MORE FLOWER & FIELD dsp


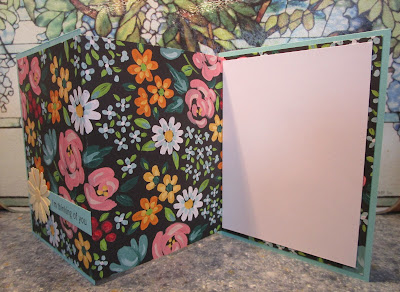
This is a great way to use up scraps of designer papers although I think I purposely cut these for this card.  I had seen a similar one on Pinterest.  I believe the one I saw on Pinterest used a ribbon behind the sentiment, but I strip of card stock works just as well.  I love the papers from this designer paper pack.  Does anyone else think this reminds them a little of stained glass windows?

It's hard to believe that tomorrow will be April 1st!  Thank you for coming by today!


Tuesday, March 30, 2021

STAMPIN' UP! - Flower & Field Daisy paper


To me daisies are such a "Happy Flower"  and the Stampin' Up! daisy punches are perfect for this paper. The card below uses a vertical piece of the designer paper.  I also used an SU punch to do the scallops from white card stock.  After punching them I added them under the daisy paper so that only the scallop would show. I think both of these cards could bring a smile for someone.


 Thank you for coming by today!

Monday, March 29, 2021

STAMPIN' UP! - Flower & Field designer paper


 Both of these cards were made simply adding strips of pieces of designer paper to the top portion of the card and a coordinating piece to the bottom of the card base.......leaving a space between them for the black strip of card stock.  Then the sentiments were stamped and cut out with an SU punch.  Very quick and easy cards but the designer papers really make them.

Thank you for coming by today!

Friday, March 26, 2021

SIMON SAYS - Bunny Butt stamp and die set #6


#6

Tucker probably wouldn't appreciate a card that is full of "pink" so I made his card with a blue card base and put the bunny peeking over the edge of some grass.

Thank you for coming by today!


Thursday, March 25, 2021

Simon Says - Bunny Butt stamp and die set #3, #4 & 5


#3 & #4

Ashlyn and Emma live together while attending the community college so I made their cards alike.


#5

Abby will receive this card.  The bottom edge of the plaid designer paper had the "Easter Wishes" as a part of the bottom edge so I took advantage and clipped it off.

Thank you for coming by today!


Wednesday, March 24, 2021

SIMON SAYS - Bunny Butt stamp and die set #2


Our oldest granddaughter, Allissa, will receive this card.  She may not be a little kid anymore but I'm not sure she's ready for an "adult" styled card.  I may have to upgrade an idea for next year.

Thank you for coming by today!

Tuesday, March 23, 2021

SIMON SAYS - Bunny Butt stamp and die set #1


Outside (see inside below)

Our granddaughter, Taryn, will get this card.  I added the dp to the front of the card and then die cut the "window" with a Spellbinders die.  Rather than throw the square away, I added glue to the back side of it and then placed it back in the opening matching the plaid so that it would serve as a backdrop to the bunny.  

I stamped the front and back side of the bunny.  I glued the two pieces together leaving the bottom area with the paws with no glue so that the bunny could be seen on the outside and inside of the card.  Adding some other stamped images to the card and it was finished.  


 There's still a space under the bunny to stamp Happy Easter and then sign it from us on the right.  I only made one of the cards this way.  Thank you for coming by today!

Monday, March 22, 2021

FLOATING ELEMENT CARD


One of my favorite blogs to follow for videos is Lisa's Stamp Studio.  Last Monday, she had a video with this technique called "Floating Element".  If you go to her web page and look at her post for Monday, March 15th, you see how this is made.  It's a little hard to describe otherwise.

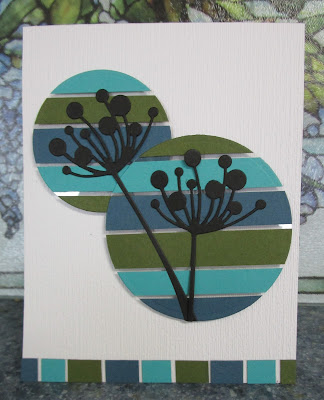
I wasn't sure where I was heading with it but first had to choose the colors I wanted to use and make some strips.  I figure using circle dies would be easy.  The die I used was Memory Box "Chloe Stem".  I may make something in another shape but for now this will be it.  I do think they would be neat using an oval or egg shape for Easter.  A heart die would be great for Valentine's Day, Wedding or Anniversary.

Thank you for coming by today.

Friday, March 19, 2021

EASTER CARDS for Care Centers


The first card is one layer and one we made for the Amana Nursing Home and this year we added the West Ridge Care Center where my mother now resides.  It meant making more cards but I was determined to make it possible.  For this one I had the bunny and sentiment all lined upon the MISTI for one of my friends.  She also colored in the pink areas with a colored pencil.  I was amazed that the next day I had all 90 of them back!  I added the grass because that had to be stamped 4 times on each card and added the sentiment in each.  (Both of these facilities lost residents to Covid in out breaks so their numbers were down but if they are full capacity next year we'll aim to get enough made for them.)  The second card is below...........


My mother was a resident at Ridgeview Independent living center for 9 years.  On Palm Sunday of 2020 she fell and her health continued to decline ever since.  But my heart is still with that facility and the wonderful staff.  As long as I am able, cards will continue to be sent there.  And because I had such a long relationship with them, their cards will usually be a step above the others.  

For this one we used the same stamps but on a 3" x 4 1/4" piece of white card stock.  I still had A LOT of papers from Lasting Impressions so cut 4" x 5 1/4" pieces for the mat and then mounted them onto the white card base.

I have saved some of the Lasting Impressions papers that might work for future holiday cards for these facilities, but just recently took 2 more boxes full of the papers to the school for them to share in the several school facilities.  Our school district consists of four sites in 4 different small towns in our county.  I'm hoping that they might be interested in some of the 12" x 12" papers that I have as well.

Thank you for coming by today!  HAVE A GREAT WEEKEND!


Thursday, March 18, 2021

STAMPIN' UP! - Flower & Field designer paper


The card starts off by cutting a 12" x 5 1/4" piece of card stock.  A great way to use up a large section of designer paper.  You can bet I'm going to do this again with other papers!!!  The directions were to then score at the 4" and 8" marks and adhere the back piece to a 4 1/4" x 5 1/2" piece of coordinating card stock. (continued)


I realized that when the card was open, it wouldn't sit quite level so I added another piece of the coordinating card stock to the front panel. The  piece on the back of the front panel can only be 5 1/2" x 4 1/8".  Then when the card is closed, you can see from the first picture that the right side shows the colored card stock from the base.  (It doesn't work to do the same thing to the middle panel.)


Thank you for coming by today!


Wednesday, March 17, 2021

HAPPY ST. PATRICK'S DAY!


 I rarely make St. Patrick's Day cards, but when I saw one similar to this, I thought I would make one for my sister's husband who is very proud of being Irish.  The shamrock leaves are punched out hearts.  First I punched three solid green leaves and added them to the white layer.  I punched out three more leaves from the dotted designer paper and creased down the center.  I used a bone folder to make the crease solid enough to run just a thin bit of Tombow glue down the back.  After the glue dried, I carefully folded the top layer of leaves up so as to give some dimension.  

My brother-in-law just has triple heart bi-pass about a month ago so I think this card will help cheer him up - although he has done remarkably well!  Very happy for him and for my sister.

Thank you for coming by today!

Tuesday, March 16, 2021

STAMPIN' UP - Lovely as a Tree (Sympathy)


The sister of one of our daughters' favorite teachers died recently.  Our daughters have been out of school and have children of their own now, but the teacher has kept in touch with a lot of the students he had before he retired.  We see his posts on Facebook now and then so we wanted to let him know that we were thinking of him.

Thank you for coming by today.


Monday, March 15, 2021

STAMPIN' UP! - Boho Medley Bundle


Of all of the paper that Stampin' Up! has made available, this one is right up at the top of my favorites.  My favorite color is blue and all of the papers in this bundle are designs of blues.  The bundle came with stamps, dies, 48 sheets of double sided 6 x 6 papers, little flowers, two kinds of ribbons some pre-embossed sheets and some die cut leaves and pieces for sentiments to be added.  I loved it so much I bought the refill for it as well. (Like I needed more paper.) So you will definitely be seeing more cards made from these supplies.

Thank you for stopping by today!

Friday, March 12, 2021

SPELLBINDERS FLORAL TRELLIS DIE


When I was going through supplies for retired items that I hadn't used in a while, I found this die from Spellabinders in my stash.  It was new and still in the original sealed package!  I decided to give it a try and cut several of them.  I forgot to add the "Stick It" double sided adhesive to the white card stock before cutting it, so I had to very carefully add little dots of Tombow Mono Liquid Glue along the edges and to some of the flowers.

I still had that package of daisy dimensional stickers on my table and I thought this particular one wojld look nice in the lower corner.  There was also a little lady but dimensional so I added it.  I really liked the way it came together and debated about selling the die.  Instead I cut 5 more of this design with a little heavier card stock and have offered those on eBay.  If they don't sell, I'll probably pull them from the listing, use them myself and list the die instead.

Thank you for coming by today!  It's Friday, so have a great weekend!


Thursday, March 11, 2021

A "MYSTERY MONDAY" STAMPING PROJECT


Sharon Armstrong usually put out a list of supplies on Sundays for what will be needed the next day.  She then gives one clue at a time o what you should do with the supplies.  Gradually you make a card.  It's interesting that with the same set of clues some cards turn out so different.

I followed the steps one by one to a certain point March 1st but then just wanted to be finished so I did my own thing. Much to my surprise the only thing different from her card was that I didn't center my sentiment piece in the middle of the card, but I did add the little die cut flowers just the way she ended up saying to do it in her clues.  

The designer paper is from the Flowers for Every Season 6 x 6 pack of designer paper.  Thank you for coming by today!

Wednesday, March 10, 2021

STAMPIN' UP! - Flower & Field dsp


The card base for this one measures 7 1/2" x 5 1/2" but still scored at 4 1/4".  That left a 1" area of the inside exposed so I added a strip of the reverse side of this pretty designer paper.  Inside there is a white piece of card stock to write a message.


Although the card base on this almost looks like it is a shade of lavendar, it is actually "Misty Moonlight".  There is a white layer and then the pretty designer paper on top.  Two strips of the Misty Moonlight were added before adding the die cut leaves and the sentiment circle on top.

Thank you for coming by today!


Tuesday, March 9, 2021

STAMPIN' UP! - Something Lacy (Retired)


I had seen a similar card on Pinterest using the Something Lacy stamp.  Their card used a different floral design on the band across the card.  I made this card in four different colors while I was playing with it.  No sentiments have been added to them as yet but they will be used for a choice of several occasions.  Check out the other three below.


 Thank you for coming by today!

Monday, March 8, 2021

PULLING OUT SOME RETIRED SU ITEMS


I punched (retired punch) out the "floral" area on the white piece of card stock and then added a scrap piece of the designer paper (retired).  The little flower added to the middle is also from a retired stamp set and retired punch.  Ribbon was added around the white piece and the entire layer was added to the card base after stamping the sentiment on it.

Below are four more cards using different papers and ribbons.  I have left room to stamp a sentiment on the fronts of them when I want to use them.
.


Thank you for coming by today!


Friday, March 5, 2021

STAMPIN' UP! - True Love Black and White dp


I cut a piece of this dp to 4" x 5 1/4" and added it to the black card base.  I decided to leave this one with no additional coloring on it.  I cut an additional piece of black card stock 2 1/4" x 5 1/4" and added So Saffron strips behind the left and right sides before attaching it to the card front.  I've had a package of dimensional stickers for a long time and decided that this vertical one really was perfect to add in the middle.  My sister's birthday is Sunday so this is the card I sent her.

Thank you for coming by today!

Thursday, March 4, 2021

STAMPIN' UP! - Mixed Bunch and Flower Shop flowers


I saw this card on Pinterest and loved the soft colors so I decided I really need to make one.  Both stamp sets had seen little use for a long time.  The leaves were die cut from a Tim Holtz die set of a variety of leaves.

Thank you for coming by today!


Wednesday, March 3, 2021

STAMPIN' UP! - One more Flower Fest Card

This card was also inspired by a card I saw on Pinterest.  The butterfly is a part of the stamp set and has a coordinating punch.  The stamp set and punch are now listed on eBay.

Thank  you for stopping by today!

Tuesday, March 2, 2021

STAMPIN' UP! - Retired Flower Fest Stamp Set


A few days ago I posted a couple of cards using a stamp from this same set.  These were stamped on colored card stock with VersaMark and heat embossed with Opaque White powder.  I then needed to fussy cut them for the card.  It really is relatively easy to cut pieces out when they have been heat embossed.  This was a CASE of a card I found on Pinterest. 

Thank you for stopping by today!


Monday, March 1, 2021


Last week I actually had the chance to do a little "fun" shopping instead of just groceries.  I decided I wanted to make a trip to Scrapmania (Cedar Rapids, IA). I went to where I thought they were only to find out they had moved - but it wasn't much further to go so I found the new store.  When I walked in, it was WOW!  It is much larger and I think they have a lot more merchandise than before.  I was there for a long time and lucky I didn't walk out with the national debt on my credit card!

(The back story) In the summer of 2019 a big, old steam engine came through our town and people gathered around the street and highway to catch pictures of it.  The family of one of my card making friends were there with us.  Her grandson has a real love of trains.  My husband put some coins on the railroad tracks to see if he could find them afterwards.  He found one and gave it to Jacob.  You would have thought Jacob had won the lottery.  

About a week ago my friend told me that Jacob needed a surgery so I wanted to send him a card.  The main reason I went to Scrapmania was to see if they hopefully had some kind of designer paper with a train.  Luck was smiling on me!  Even better than "just a train" it was a steam engine. In order to get the full portion of the design on this card, I had to make the card 8 1/2" x 5 1/2".  

I folded a piece 8 1/2" x 11" card stock in half, lightly traced around the card base onto the designer paper and cut that portion out.  All I had to do was add the little sentiment to the front.  I typed a letter to Jacob reminding him of who we are and that we were wishing him a recovery from the surgery.  I added it as a liner to the inside of the card.  I also enclosed a package of dimension stickers that were all railroad style stickers. 

I did find a few sheets (and I mean about a dozen sheets) of designer paper.  Several are for Easter cards next year and three sheets are for autumn cards.  You'll probably see some cards from other sheets soon. 

Thank you for coming by today!


STAMPIN' UP! - Coloring True Love dsp


The daisy piece comes from a sheet that has the design all black and white.  I colored the flowers with SU Blenders and then matted it with black card stock.  The sentiment was stamped, punched out and then mounted on a scalloped circle with black card stock.

Thank you for coming by today!


Two more cards using the "All About Autumn" retired dsp. Thank you for coming by today!